
Let your users sell
Let the people and workspaces in your app sell through it on Stripe Connect, with Stripe's onboarding inside your app.
Selling lets the people or workspaces in your app become sellers: they open a seller account with Stripe from inside your app, and you set the fee you take on each sale. Stripe verifies each seller and pays them out; your app never handles their identity documents or bank details.
Note
Test in Staging, then go live in Production. Selling uses the Stripe
keys saved in each environment: test keys in Staging, where nothing real is
charged, then live keys in Production
(test in Staging, then go live). The
seller screens below are in @buildbase/sdk
1.2.0 and later; the server routes work with any version.
'use client';

import { SellerHome, useSaaSAuth } from '@buildbase/sdk/react';
import { loadConnectAndInitialize } from '@stripe/connect-js/pure';

export default function SellingPage() {
  const { user } = useSaaSAuth();
  return (
    <SellerHome
      subject={{ user: true }}
      defaultDisplayName={user?.name}
      defaultEmail={user?.email}
      loadConnectAndInitialize={loadConnectAndInitialize}
    />
  );
}
Before you start
Save your Stripe test keys first, in your Staging environment, under Billing, Credentials: Selling and Item types appear in the Billing menu only once they are saved. Then set selling up under Billing, Selling. The setup checklist walks through each step and turns selling on at the end. If the page says Selling is not open for this app yet, contact BuildBase support to turn it on.
Walkthrough
New to selling? Zero to first sale: marketplace and Zero to first sale: storefront walk the whole flow once, from Stripe keys to a refund and going live.
When to use it
Turn selling on when the people or workspaces in your app should sell to each other through it. Pick the marketplace shape when your app should take each payment, answer refunds and disputes, and pay sellers out. Pick the storefront shape when each seller should be paid on their own Stripe account and answer their own refunds and disputes, with your fee sent to you from each sale.
Before you start
- Stripe keys saved under Billing, Credentials: test keys in Staging first, live keys in Production when you go live.
- Connect turned on in your Stripe account, with the platform profile complete, in the mode of your keys.
- Selling open for your app: Billing, Selling says Selling is not open for this app yet until it is. Contact BuildBase support.
- Selling through Stripe Connect in your BuildBase plan. Without it, the controls that save stay on screen, disabled, with the plan's sentence. Reads, refunds, cancels and turning selling off are never locked.
Set it up in the console
Billing, Selling, Overview: the seven steps in Setting it up in the console. The tabs beside it are Sellers, Items, Orders, Subscriptions, Bookings, Calendars, Coupons, Affiliates, Settings and Stripe events, each shown to roles that hold its permission.
Marketplace and storefront
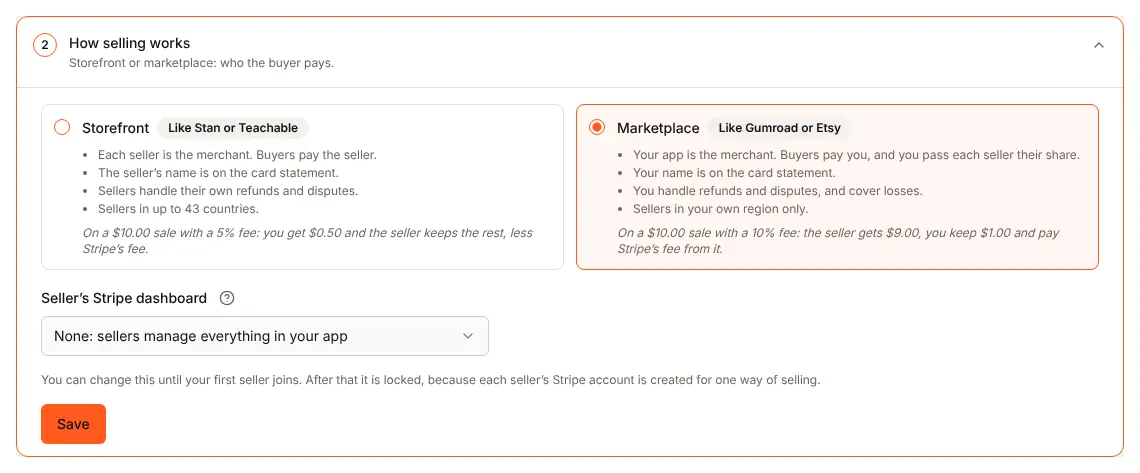
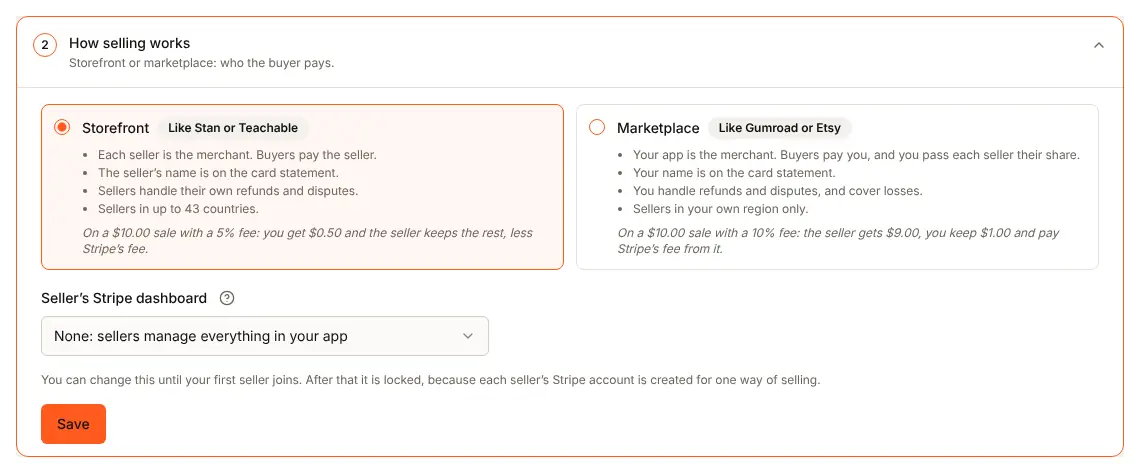
The table in Storefront or marketplace sets out who the buyer pays, who refunds and who pays Stripe's fee. In the marketplace shape a seller gives an email and can be in fewer countries.
What the seller sees
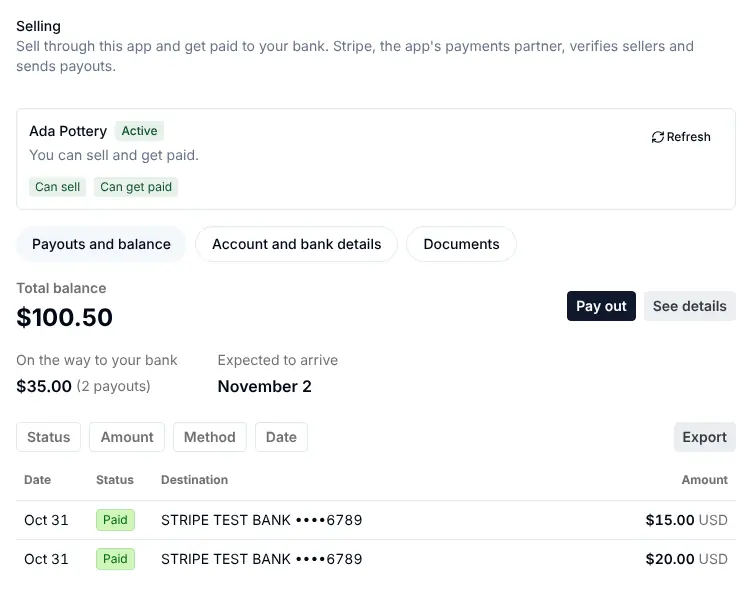
<SellerHome> inside your app, from Start selling through Stripe's
onboarding to Can sell and Can get paid, with Payouts and
balance once active. See What a seller sees.
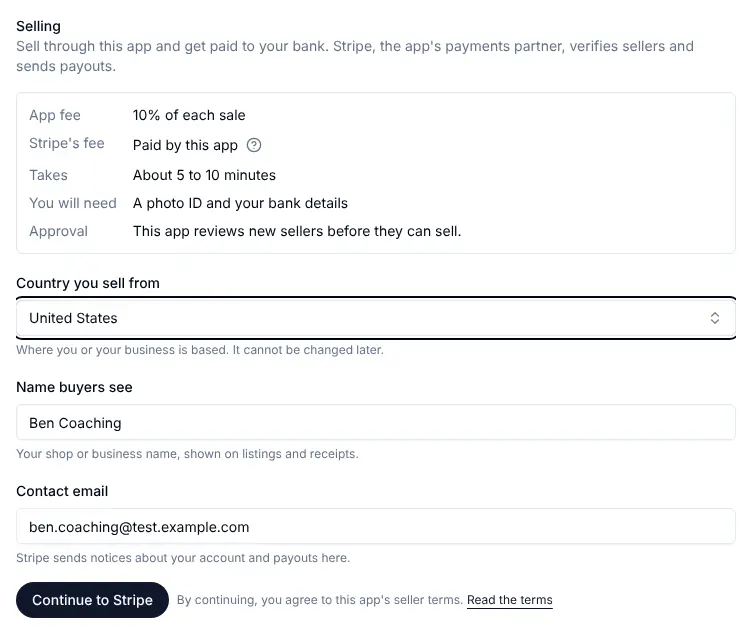
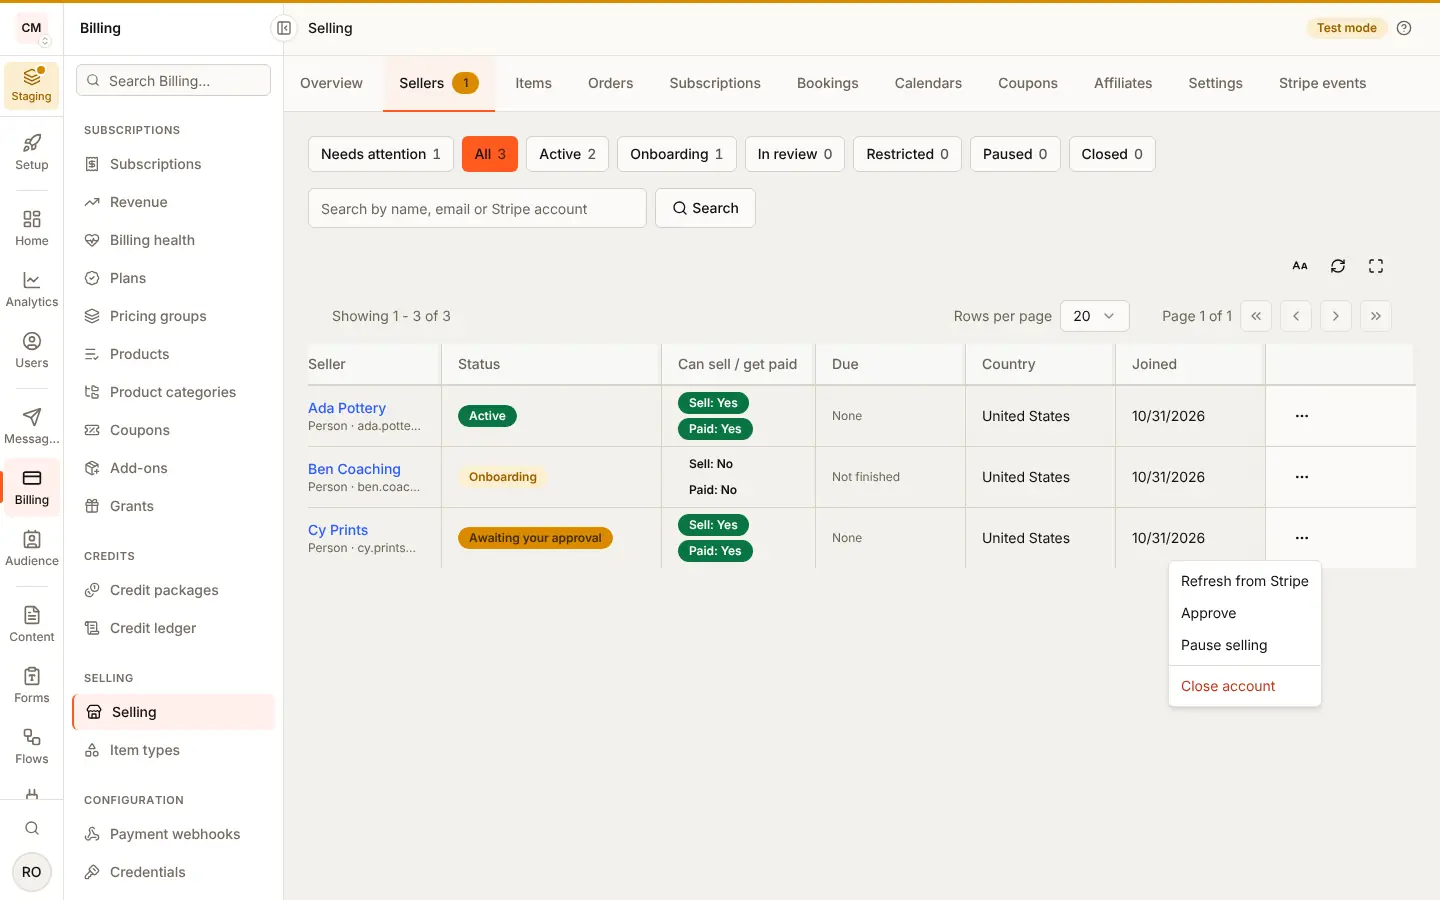
You see each seller under Sellers, with Pause, Resume, Approve and Close.
What the buyer sees
Nothing of selling itself: buyers meet the items your sellers list and pay through checkout.
Emails and webhooks
BuildBase sends no email and no webhook event about a seller's account.
Read a seller's state with useSelling, or under Sellers; it updates
from Stripe through the Connect endpoint of setup step 5. Payouts send
payout.created, payout.paid and payout.failed
(payouts).
Limits
The shape locks once the first seller joins. A closed seller cannot start
again (SELLER_TERMINAL). An export covers at most 366 days and 10,000
orders.
Staging and Production
Selling uses the Stripe keys saved in each environment: test keys in Staging, live keys in Production. See Test in Staging, then go live and Before going live.
Storefront or marketplace
You pick one when you set selling up. It locks once the first seller joins, because each seller's Stripe account is created for it.
| Storefront | Marketplace | |
|---|---|---|
| Who the buyer pays | The seller | Your app, which pays the seller out |
| Refunds and disputes | The seller's | Yours |
| Stripe's fees | The seller's, or yours if you choose | Yours |
| Seller's countries | Countries Stripe supports for sellers in your account's region | A narrower list Stripe can pay out to |
| Seller gives an email | No | Yes, Stripe's contact for the seller |
Setting it up in the console
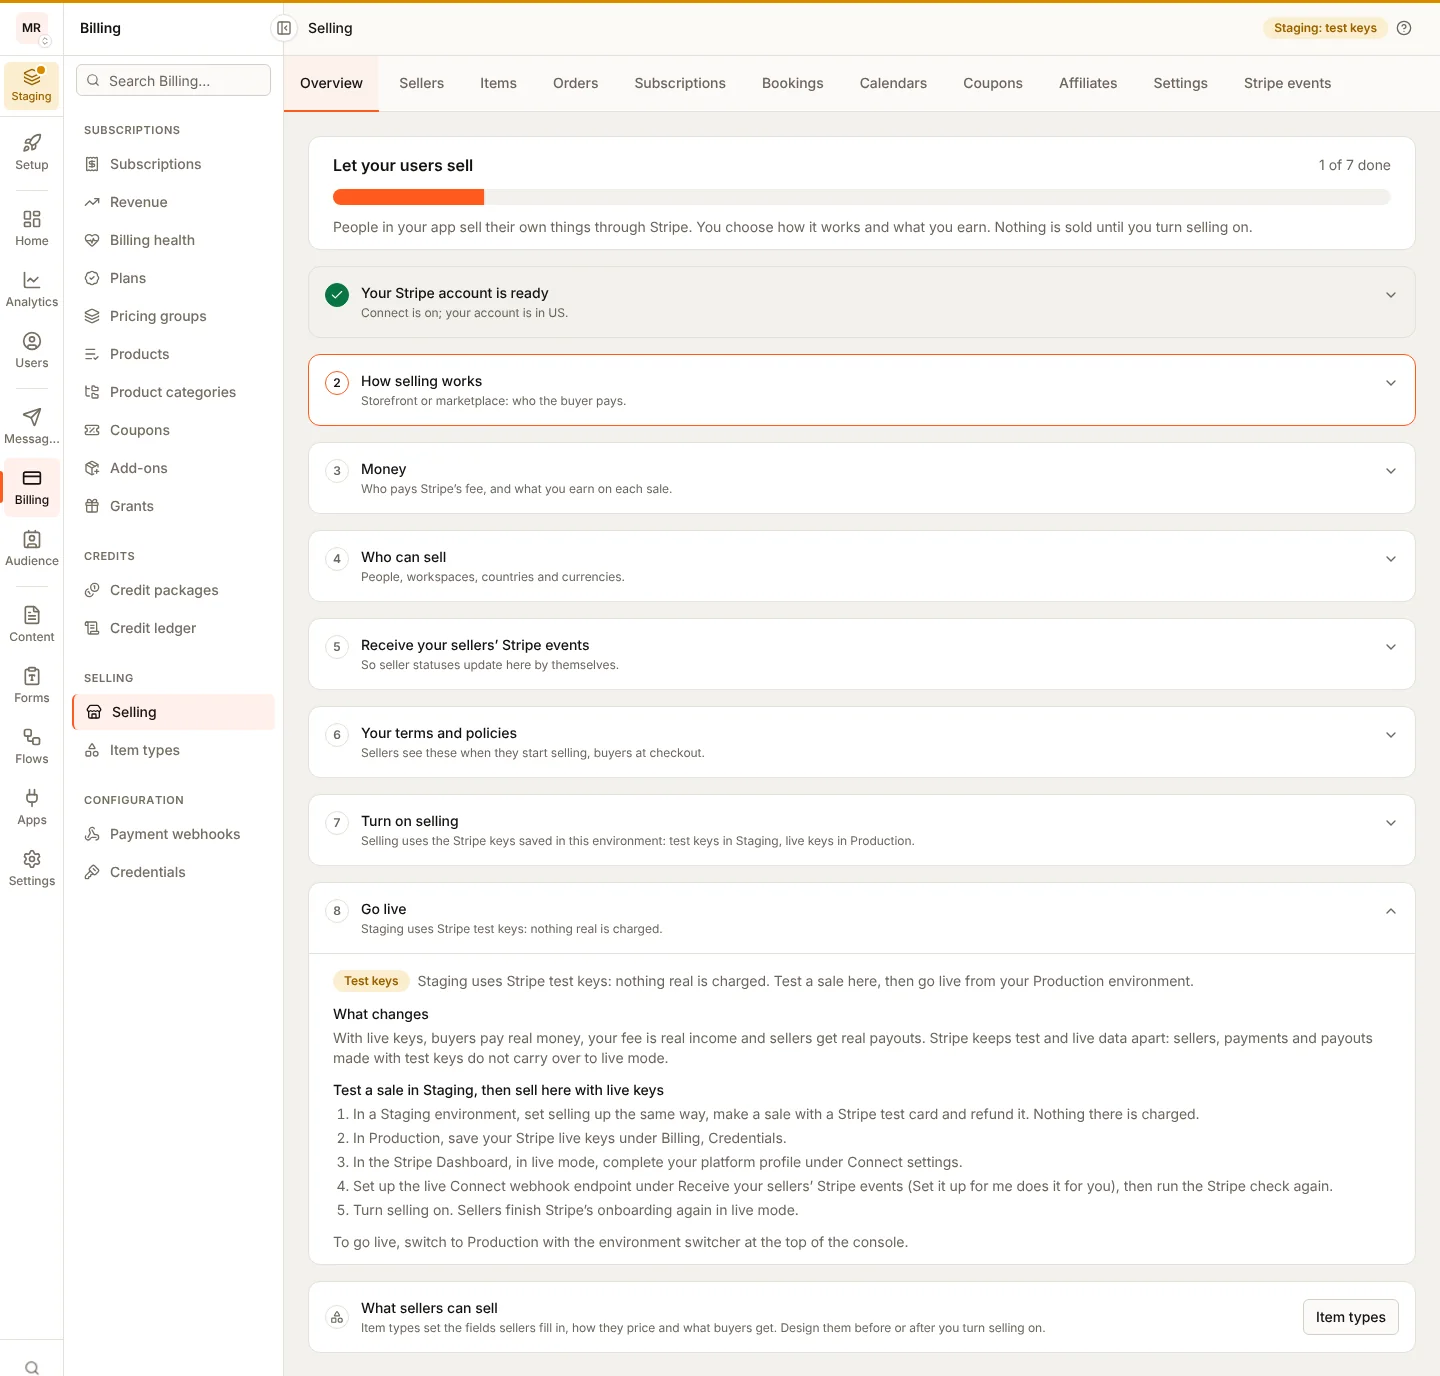
The checklist on Selling has seven steps; each saves on its own:
- Stripe readiness - your secret key works, Connect is on in your Stripe account, and its country is known. A failed check links to the Stripe page that fixes it.
- How selling works - storefront or marketplace.
- Money - your fee as a percent, a fixed part and a minimum, with a live
preview of what the seller keeps at $5, $10, $50, $100 and $500; what
happens to your fee on a refund; and tax at checkout.
Saving it from your server (
PATCH /api/marketplace/settings/money), a field you leave out keeps its saved value, your fee included; send"feeRule": nullto take no fee. - Who can sell - people, workspaces or both; countries; currencies; whether you approve each seller by hand.
- Seller updates from Stripe - a Connect webhook endpoint in your Stripe account. "Set it up for me" creates it; on a server without a public https address, create it in Stripe and paste its signing secret.
- Terms - your seller terms and refund policy (required) and a fee disclosure page.
- Turn on selling.
Below the seven steps, Go live says what changes with live keys and how to switch, as in Test in Staging, then go live.
Sellers then appear under Sellers, with their status, what Stripe still needs from them, and Pause, Resume, Approve and Close.
Turning selling off. Turn off selling under Selling stops every
sale and every new listing at once. A checkout of any kind (paid, a free
claim, a subscription, payment in parts, a cart, a guest's) answers 503
SELLING_UNAVAILABLE, and publishing or approving an item is refused the
same way. What was already sold is untouched: buyers keep what they bought,
and orders, refunds, cancels, fulfilment, the later parts of an order paid in
parts and payouts keep working. Sellers keep their Stripe accounts and can
still edit drafts and hide what is live. Turn selling on again and everything
sells as before. Pause selling on one seller does the same for that
seller alone (SELLER_CANNOT_SELL), and holds even when an update from Stripe
arrives while you pause.
What sellers can list is set by item types, which the checklist links to. You can design them before or after you turn selling on.
Buyers, payouts and records
Under Billing > Selling > Settings, the Buyers, payouts and records
card holds choices that each start at the safer one. Saving it from your
server is PATCH /api/marketplace/settings/policies with
{ "policies": { ... } }; a field you leave out keeps its saved value, and
an org that never saved one reads the default.
Setting (policies.) | Default | Other choices | What it does |
|---|---|---|---|
buyerCountry | ask_before | refund_after | A buyer outside an item's countries is refused before payment, or refunded after (item types) |
buyerCountryRefusalEmail | true | false | Email the buyer of an order refused for their country |
payoutHoldHours | 72 | 24, 0 | Payouts to an affiliate's new PayPal address or bank account wait this long (affiliates) |
payoutDestinationConfirm | true | false | A new payout destination is used only once confirmed by a one-time link |
webhookRetentionDays | 90 | 30, 365 | How long stored shipping (EasyPost, Shippo) and PayPal events are kept |
coSellers | owner_only | invite | Who adds a co-seller to an item: you, or a seller's invitation the invitee accepts |
affiliateContact | hidden | consented | Sellers never see their affiliates' email, or see it for affiliates who agreed (affiliates) |
addressMismatch | flag_hold | requote, ignore | Your sellers' default when the address paid for is not the quoted one; each seller can choose otherwise (shipping) |
disputeLoss | charge_seller | owner_bears | A lost marketplace dispute: reverse the seller's transfer, or you bear it (orders) |
revokeOnOpenDispute | false | true | Take access back when a dispute opens (given back on a win), not only when it is lost |
Co-sellers. An item's sales can be split between sellers (its
payees, shares that add up to 100%, marketplace shape only). With
coSellers at owner_only (the default) only you set the split, in the
console or from your server, and a seller who names another seller in an
item save is refused (payee_not_allowed). With invite, an item's seller
offers another seller a share and the invitee answers, through the SDK
routes for the person or the workspace (the workspace ones need
SELLING_MANAGE):
Route (under /api/v1/public/me/selling or /api/v1/public/workspaces/:workspaceId/selling) | Body | What it does |
|---|---|---|
GET /co-sellers?direction=received|sent | The seller's invitations, newest first | |
POST /co-sellers | { itemId, sellerId, shareBps } | Offer another seller a share, taken from the inviting seller's |
POST /co-sellers/:invitationId/accept | { "consent": true } | Accept: the split changes now, and the consent is kept with who and when |
POST /co-sellers/:invitationId/decline | {} | Decline; nothing changes |
POST /co-sellers/:invitationId/withdraw | {} | The inviting seller takes an open one back |
The split changes only on accept, and only if it is still the one the
invitation was made against: a split you or the seller changed meanwhile
is refused with 409 CO_SELLER_REFUSED, as is an invitation older than
14 days. Under owner_only the routes answer 403 CO_SELLERS_OWNER_ONLY.
Stored provider events. Each shipping or PayPal event is stored once by
its id, then applied, and removed webhookRetentionDays after it arrived.
Changing the setting re-dates the events already stored, so a shorter window
removes older ones at the database's next expiry pass. Stripe Connect events
are kept for their own year, and 90 days after each arrived its body is
stripped of personal data (names, emails, addresses, amounts): the event's
id, type, account and status stay. That window is not a setting.
Test in Staging, then go live
Selling uses the Stripe keys saved under Billing, Credentials in each
environment. Make your first run in a Staging environment, which takes Stripe
test keys only (sk_test_, pk_test_): turn selling on with your test keys,
start selling as a test user, buy an item with a
Stripe test card and refund it. You see the
whole flow, seller onboarding to payout, and nothing real is charged. A live
key saved in Staging is refused with "Staging accepts Stripe test keys only
(sk_test_ and pk_test_). Live keys belong in production.", and a live key that
reaches selling there some other way is refused with SELLING_UNAVAILABLE.
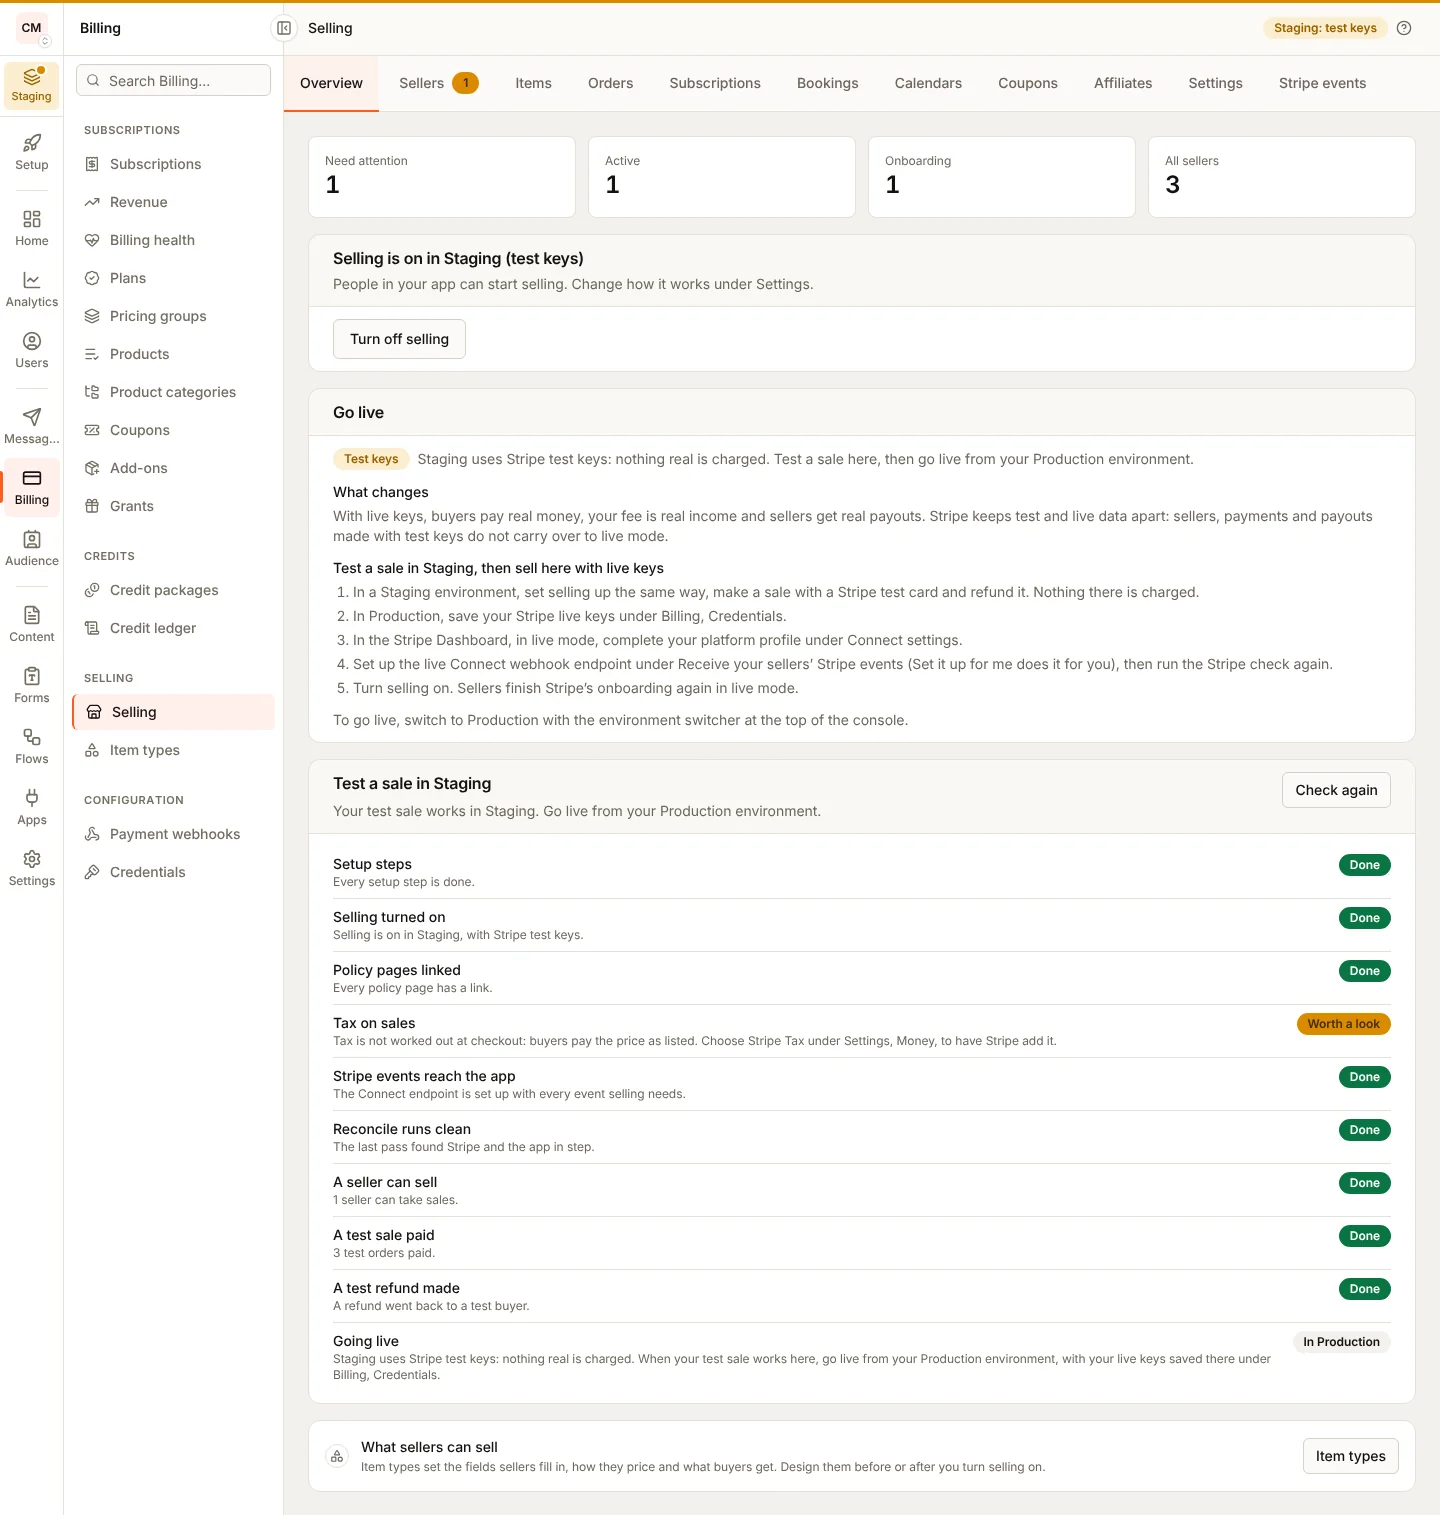
The Selling header reads Staging: test keys.
No Staging environment yet? Environments are switched on per app as the platform rolls them out (environments). Until your app has one, Production accepts Stripe test keys too: make your first test sale there with your test keys, then switch to live keys there.
What changes with live keys. Buyers pay real money, your fee is real income and sellers get real payouts. Stripe keeps test and live data apart: sellers, payments and payouts made with test keys do not carry over, so each seller finishes Stripe's onboarding again in live mode.
To go live in Production:
- Switch to Production with the environment switcher at the top of the console. Its settings and item types are its own, so set selling up there as you did in Staging.
- Save your Stripe live keys under Billing, Credentials. The Selling header reads Test keys until you do, then Live.
- In the Stripe Dashboard, in live mode, turn Connect on and complete your platform profile.
- Under Selling, set up the live Connect webhook endpoint (Set it up for me, or create it in Stripe and paste its signing secret), and run the Stripe check again.
- Turn selling on.
Live keys work in Production once live selling is open for your app. Until
then the Go live step says Not open yet, and selling with a live key
is refused with SELLING_UNAVAILABLE. To open it, contact BuildBase support.
Live selling is part of the Grow and Scale plans: on Free or Launch, Production
sells with your Stripe test keys, and turning selling on with live keys (or
switching to live keys while selling is on) answers 402 FEATURE_NOT_IN_PLAN
with an upgrade link. Staging and Development sell with test keys on every
plan.
Live selling is opened per app while it is a pilot: BuildBase adds your app to
the live-selling pilot list. Until it is on the list, Production keeps selling
with your Stripe test keys, and three things answer 403
LIVE_SELLING_NOT_ALLOWED ("Live selling is open to apps in the BuildBase
pilot only for now."): turning selling on with live keys, switching the keys
under Billing, Credentials from test to live while selling is on, and a
buyer's checkout with live keys (the buyer reads only "This app cannot take
payments right now."). Staging and Development are not affected. An app that
does not sell keeps saving live keys for its own billing, and a live key can
always be replaced by another live key. If live selling is closed again for
your app, new live checkouts stop, while refunds, cancellations and payouts of
the orders you already took carry on.
Tax at checkout
Under Money, Tax at checkout is off by default: buyers pay the price as listed. With Stripe Tax, Stripe works out the tax on each checkout and adds it to what the buyer pays.
- Where it runs. In the marketplace shape, on your Stripe account; in the
storefront shape, on each seller's own Stripe account, which each seller
sets up in Stripe. Stripe Tax's own settings must be complete on that
account, or checkout says so:
CHECKOUT_REFUSEDwith the problemtax_not_ready. - What the order keeps.
taxon the order and its line, andtotalas charged. The seller's share stays what the price gives them. A refund of the line returns its tax with it. - Subscriptions. Stripe Tax runs on the first invoice and every one
after it, a move to another tier included. Each payment records its
tax, and your fee is taken on the amount before tax. Stripe splits a subscription's invoice by percent, tax included, so once each invoice is paid BuildBase puts the split right: in the marketplace shape the seller's percent of the tax comes back from their transfer, since the tax is yours; in the storefront shape your percent of the tax goes back to the seller, since the tax is theirs. A refund of a renewal never takes the tax back from the seller in the marketplace shape. - Prices paid in parts. Each part is taxed as it is paid: the first on
Stripe's checkout page, from the address the buyer gives there; each later
part by Stripe Tax from that same address, charged on top of the part and
recorded with Stripe Tax for its reports. A part's
taxshows once it is paid. The fee and the seller's share are of the part before tax, and a refund of a part never takes the tax back from the seller in the marketplace shape. Working out a later part's tax needs Stripe Tax activated on the account, not only set up: until it is, charging the part is refused withPART_REFUSEDsaying so, and nothing is charged. - Carts. In the marketplace shape, Stripe works out the tax once on the cart's one page, on your account, and each order and line records its own share of it from Stripe's line items; sellers are sent their share without the tax. A subscription in a cart is paid per invoice, so its seller is sent their share of each invoice without the tax, with nothing to put right after. In the storefront shape, each step of the cart is taxed on its seller's account, as a single sale is. See carts.
Which registrations to hold, and what to file, is for you and your sellers to decide with your advisers; the platform does not say.
Before going live
Once selling is on, the Overview tab lists what is done before you could sell with live keys, each a fact the platform checks: the setup steps, selling on, links to the five policy pages, tax at checkout, the Connect endpoint's events, a recent clean Reconcile and a seller who can sell. The list follows the environment:
- In Staging it asks for a paid test sale (
todountil there is one) and a test refund, and ends with Going live (info, shown as In Production): nothing real is charged there, and going live happens in Production. - In Production it adds Platform profile in live mode
(
platform_profile), the events item reads Live Connect webhook endpoint once live keys are saved, and a first sale and a refund are recommended (warn), never required, since the test sale belongs in Staging. Live keys islockedonly while live selling is not open for your app (contact BuildBase support to open it),todowhile your saved keys are test keys, andokonce they are live.
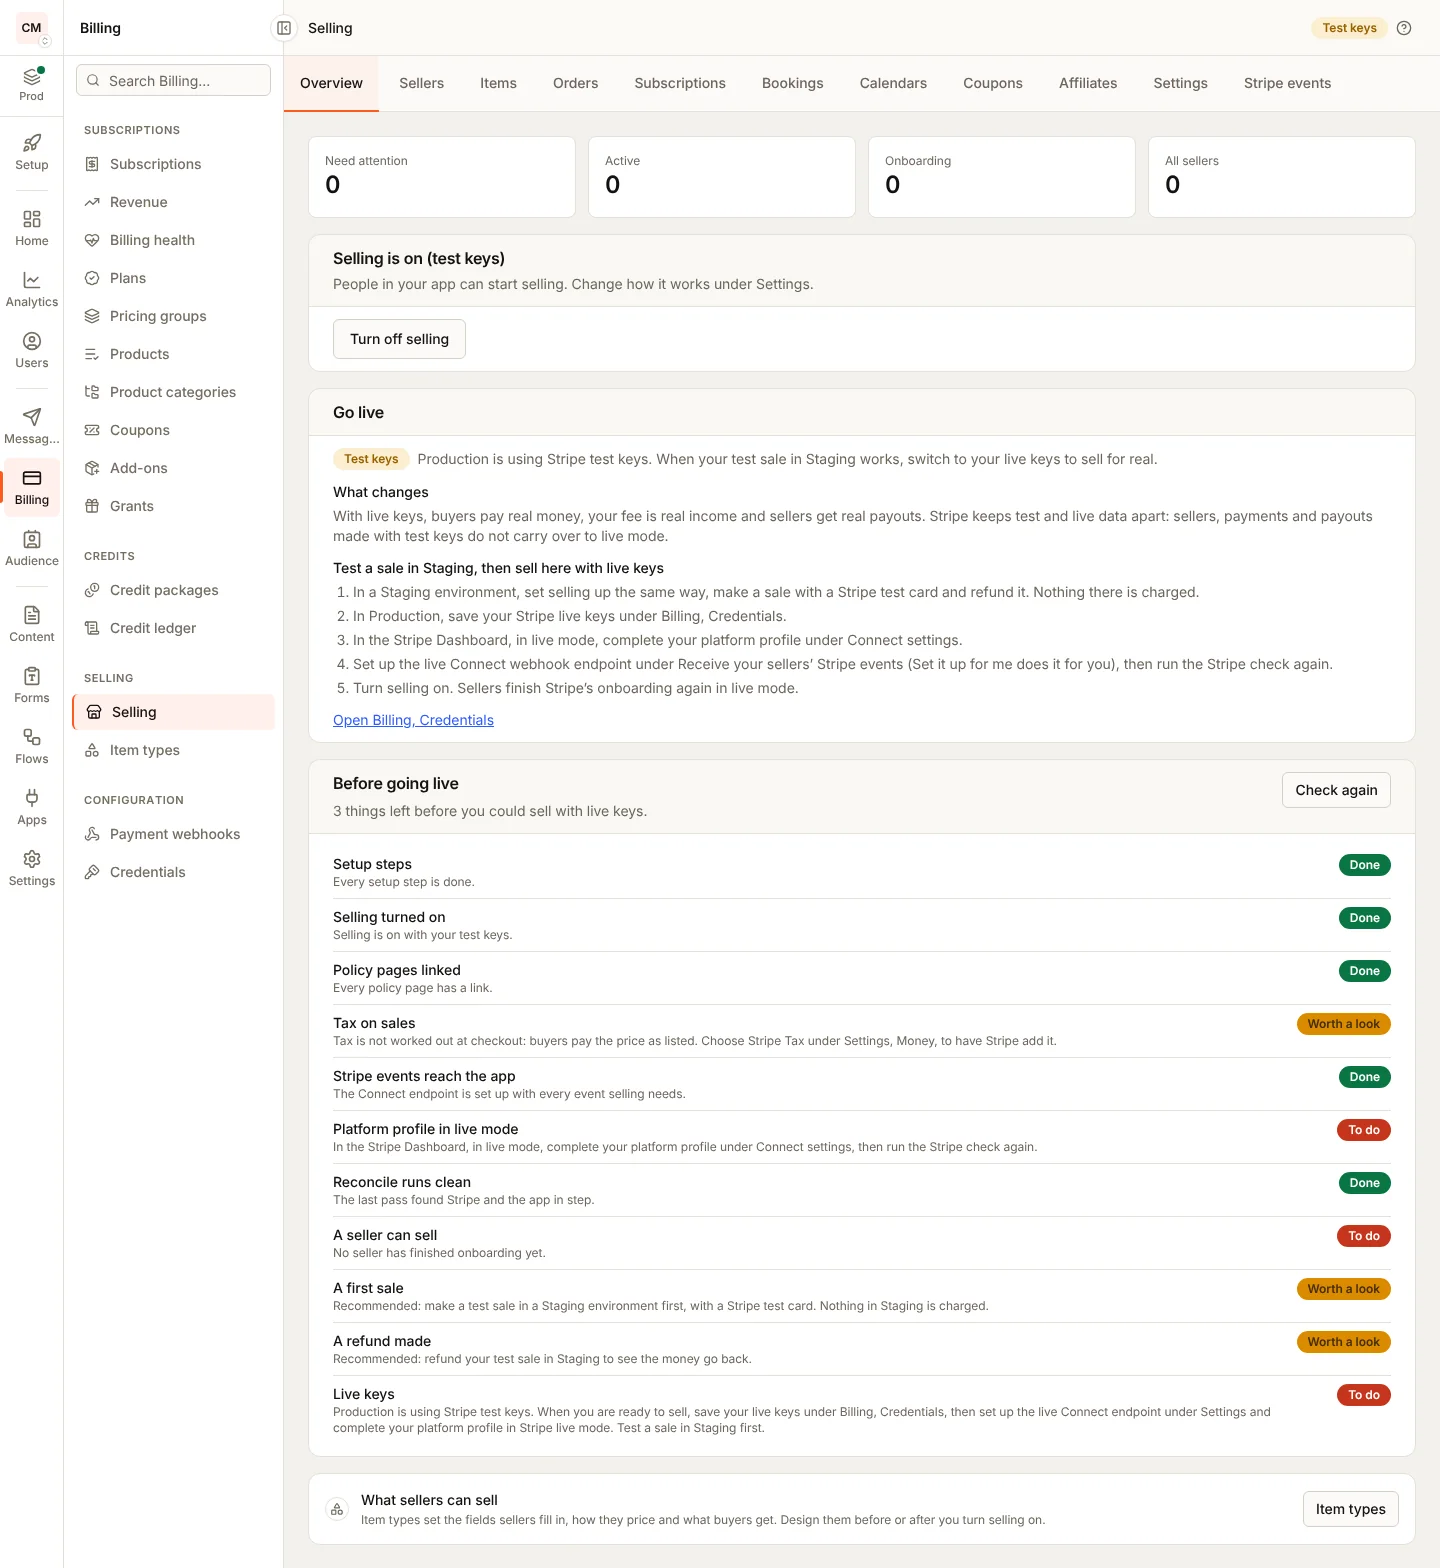
Read it from your server with GET /api/marketplace/go-live: checks, each
ok, todo, warn, locked or info; liveOpen, true only in
Production once live selling is open; and environment (name,
production).
Exporting sales
Orders, Export CSV saves the paid orders between two dates, one row per order: when it was paid, its status, the seller, the buyer, what was bought, the currency, subtotal, tax, total, your fee, the seller's share, refunded, paid in parts and the subscription. Amounts are plain decimals (19.99, or 1000 for yen). An export covers at most 366 days and 10,000 orders, newest first.
- Your server:
GET /api/v1/server/commerce/orders/export?from=&to=, withsellerTypeandsellerIdfor one seller. - A seller:
GET /api/v1/public/me/sales/export(or/workspaces/:workspaceId/sales/exportwithworkspace:selling:view), and the Export CSV button in<SellerSales>, oruseSalesExport.
A range the platform cannot give answers EXPORT_REFUSED.
Adding the seller screens to your app
Install Stripe's loader, and pass it to the provider or to the component. BuildBase adds no Stripe dependency of its own.
npm install @stripe/connect-jsimport { ApiVersion } from '@buildbase/sdk';
import { SaaSOSProvider } from '@buildbase/sdk/react';
import { loadConnectAndInitialize } from '@stripe/connect-js/pure';
import '@buildbase/sdk/css';
function BuildBaseProvider({ children }: { children: React.ReactNode }) {
return (
<SaaSOSProvider
serverUrl="https://api.console.buildbase.app"
version={ApiVersion.V1}
orgId="your-org-id"
loadConnectAndInitialize={loadConnectAndInitialize}
// auth and your other props as in the installation guide
>
{children}
</SaaSOSProvider>
);
}The rest of the provider is as in installation.
Import from @stripe/connect-js/pure in Next.js: it loads nothing while the
page renders on the server. Your Content-Security-Policy must allow
https://connect-js.stripe.com and https://js.stripe.com in script-src
and frame-src.
The workspace settings dialog shows Selling (a workspace as the seller) and Personal selling (the signed-in person) while selling is on or paused, for the subjects you let sell. They open Stripe's screens through the loader on the provider.
What a seller sees
<SellerHome> shows the step the seller is at:
| Seller's state | What the screen shows |
|---|---|
| Not started | Start selling: your fee, who pays Stripe's fee, about 5 to 10 minutes, what to have ready, then country, name and (marketplace) email |
| Onboarding | Stripe's onboarding inside your app; leaving it saves progress, and "Continue setup" picks it up |
| In review | Stripe is checking their details |
| Active | "Can sell" and "Can get paid", Stripe's notices, account and bank details, documents |
| Action needed | The date Stripe needs more details by |
| Paused by you | Your pause reason |
| Closed or rejected | Why, and nothing to act on |
Every word is in the SDK's eight languages. Stripe's own forms follow your theme's colors.
Props
| Prop | Type | Default | Description |
|---|---|---|---|
subject | { user: true } or a workspace id | Required | Who sells |
canManage | boolean | true | Start selling and open the account's settings; false shows status only |
defaultDisplayName | string | - | Prefills the name buyers see |
defaultEmail | string | - | Prefills the contact email |
defaultCountry | string | - | Preselects a country you allow |
loadConnectAndInitialize | function | The provider's | Stripe's loader |
title, description | string | null | Translated | null hides them |
Building your own screens
useSelling(subject) is the same flow without the markup:
import { sellerAbilities, useSelling } from '@buildbase/sdk/react';

export function SellerBadge() {
  const { seller, loading } = useSelling({ user: true });
  if (loading || !seller) return null;
  const { canSell } = sellerAbilities(seller);
  return <span>{canSell ? 'Selling' : 'Setting up'}</span>;
}
It returns { seller, selling, loading, error, refetch, start, starting, startError, sync, syncing }. StartSelling, SellerStripeFrame (any one of
Stripe's embedded screens) and SellerStatusBadge are exported on their own.
Permissions
A workspace sells through two permissions:
| Permission | Allows | Default roles |
|---|---|---|
workspace:selling:view | See the workspace's seller status | Admin, editor |
workspace:selling:manage | Start selling, Stripe's onboarding, account settings | Admin |
A person always manages their own selling.
When starting is refused
The request answers with a code; the SDK shows each in the reader's
language.
code | Meaning | What to do |
|---|---|---|
SELLING_UNAVAILABLE | Selling, or live selling, is not open for this app; or a live key in a non-production environment such as Staging | Contact BuildBase support to open selling or live selling; in Staging use test keys and go live in Production |
LIVE_SELLING_NOT_ALLOWED | Live selling in Production is open to apps on the BuildBase pilot list, and this app is not on it yet (403) | Keep selling with test keys, or contact BuildBase support to join the pilot |
CONNECT_NOT_READY | Your Stripe account cannot create sellers yet | Run the Stripe check under Selling and fix what it links to |
SELLER_SUBJECT_NOT_ALLOWED | You do not let this kind of subject sell | Allow people or workspaces under Who can sell |
SELLER_COUNTRY_NOT_ALLOWED | A country you do not allow | Allow the country under Who can sell |
SELLER_EMAIL_REQUIRED | A marketplace seller sent no email | Send an email (defaultEmail, or let the seller type one) |
SELLER_TERMINAL | The seller's account is closed and cannot start again | Nothing: a closed seller cannot sell again |
SELLER_NOT_FOUND | The subject has not started selling | Start selling first, with <SellerHome> or useSelling().start |
Next Steps
- Add-ons - sell extra capacity on top of your plans.
- Permissions - give a role the selling permissions.
- Webhooks - events from your app to your server.