
Zero to first sale - marketplace
From saving your Stripe keys to a seller paid out - the marketplace shape end to end, where your app takes the buyer's money and pays each seller their share.
This guide takes an app from no selling at all to a paid, fulfilled and refunded sale in the marketplace shape, then live. In the marketplace shape the buyer pays your app: Stripe charges on your Stripe account and sends each seller their share (a destination charge). You own refunds and disputes, and Stripe's processing fee is yours.
Selling a storefront instead, where each seller is paid on their own Stripe account? Follow Zero to first sale: storefront. The two guides share their steps; the differences are called out in each.
Note
What you can use today. Every console step and server route below
works now. The SDK screens and hooks (<SellerHome>, <SellerItems>,
<BuyButton>, <SellerSales> and the rest) are in
@buildbase/sdk
1.2.0 and later. You can also call the routes named on each module's page
from your own screens.
Before you start
- A BuildBase app with the SDK installed (installation) and two test users you can sign in as: one seller, one buyer.
- A Staging environment to test in (step 0). It takes Stripe test keys only, so nothing real is charged.
- A Stripe account. In the Stripe Dashboard, in test mode (the mode of your test keys), turn Connect on and complete your platform profile.
- A webhook endpoint on your server for BuildBase events, if your server acts on sales (webhooks).
- Selling open for your app. If Billing, Selling says Selling is not open for this app yet, contact BuildBase support.
What you will have at the end
- Stripe test keys saved in Staging, and selling set up there as a marketplace.
- An item type your sellers list under.
- A seller who finished Stripe's onboarding inside your app.
- A published item, a buyer who paid for it, and the order fulfilled.
- A refund, a payout on its way, the go-live list ticked off, and selling live in Production.
Steps 1 to 12 run in Staging on Stripe test keys: no real money moves.
0. Open Staging
Everything up to step 12 happens in a Staging environment. In the console, choose Staging in the environment switcher at the top, or add it there with Add environment (owners and admins). Staging keeps its own users, settings and Stripe keys apart from Production, and takes Stripe test keys only. Point your app at it with its environment key (environments), so the seller and buyer you sign in as in steps 5 and 7 are Staging users.
No Staging environment yet? Environments are switched on per app as the platform rolls them out: yours has them once the console shows Environments under Settings > General. Until then, your Production environment accepts Stripe test keys too. Make your first test sale there with your test keys (steps 1 to 12, with a Test keys badge on Selling), then switch to your live keys there in step 13.
1. Save your Stripe test keys in Staging
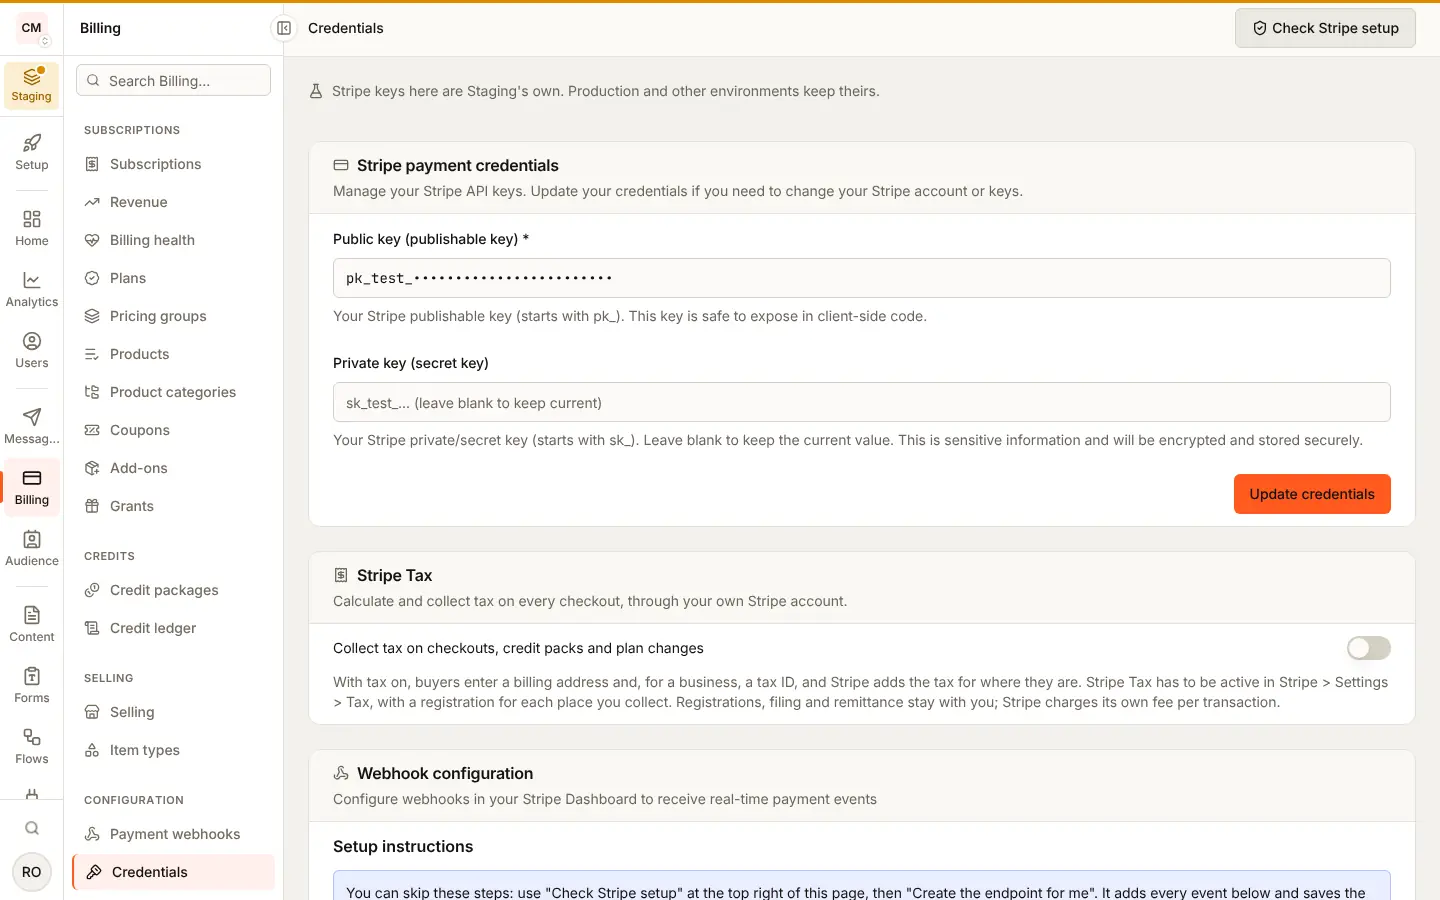
In the console, in Staging, open Billing, Credentials and save your Stripe test
secret and publishable keys. Selling and Item types appear in the
Billing menu, under Selling, once they are saved. Staging refuses a
live key: "Staging accepts Stripe test keys only (sk_test_ and pk_test_).
Live keys belong in production."
In the marketplace shape Checkout runs on your own Stripe account, so its payments reach BuildBase through your Stripe webhook, the one under Webhook configuration on the same page. If you have not set it up for your plans already, press Check Stripe setup at the top right and let it create the endpoint, or create it by hand from the steps there and press Save webhook secret.
2. Set selling up as a marketplace
Open Billing, Selling. The Overview tab is a checklist of seven steps, each saved on its own:
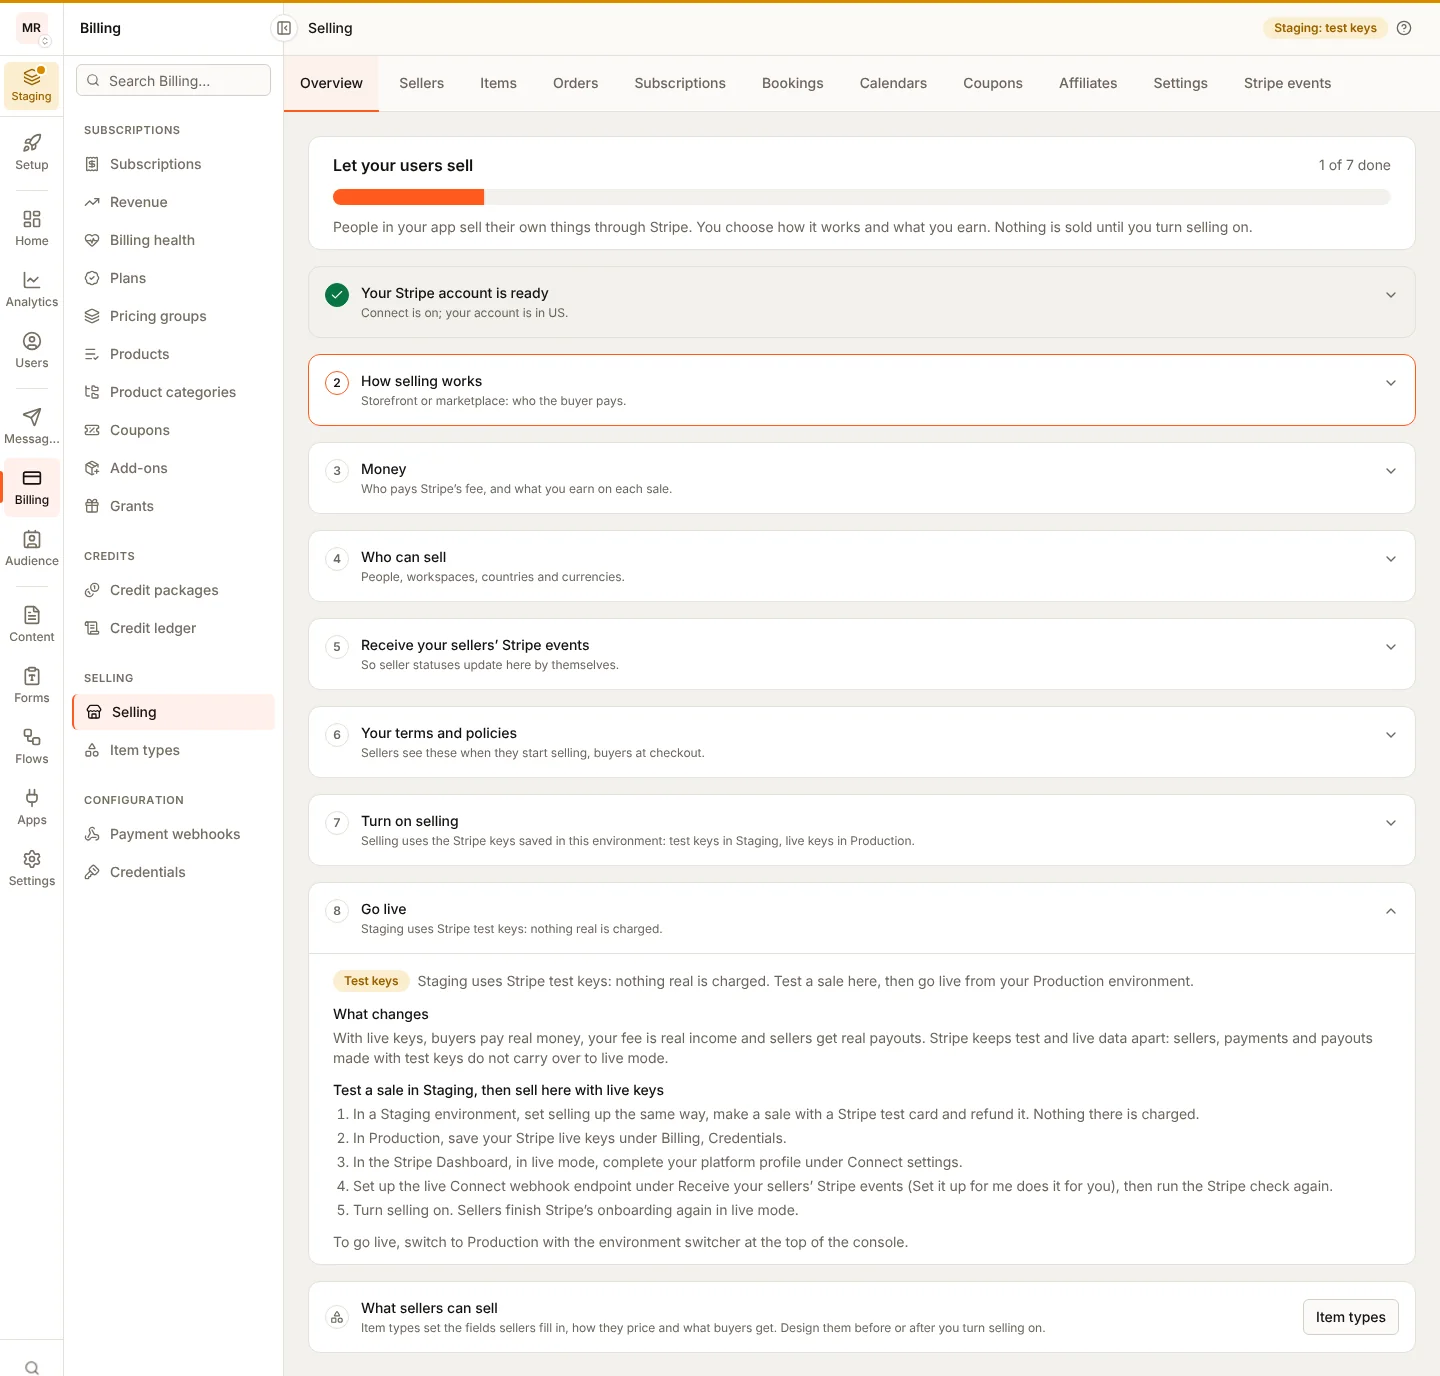
- Your Stripe account is ready. Press Check my Stripe account. It confirms your secret key works, Connect is on, and your platform profile is complete; a failed check links to the Stripe page that fixes it.
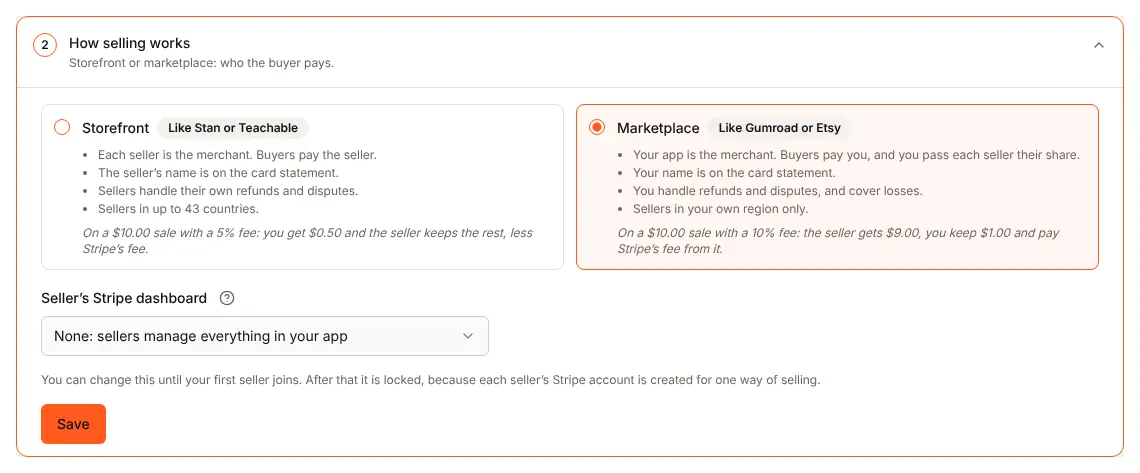
- How selling works. Choose Marketplace: the buyer pays your app, and your app pays the seller. The choice locks once the first seller joins.
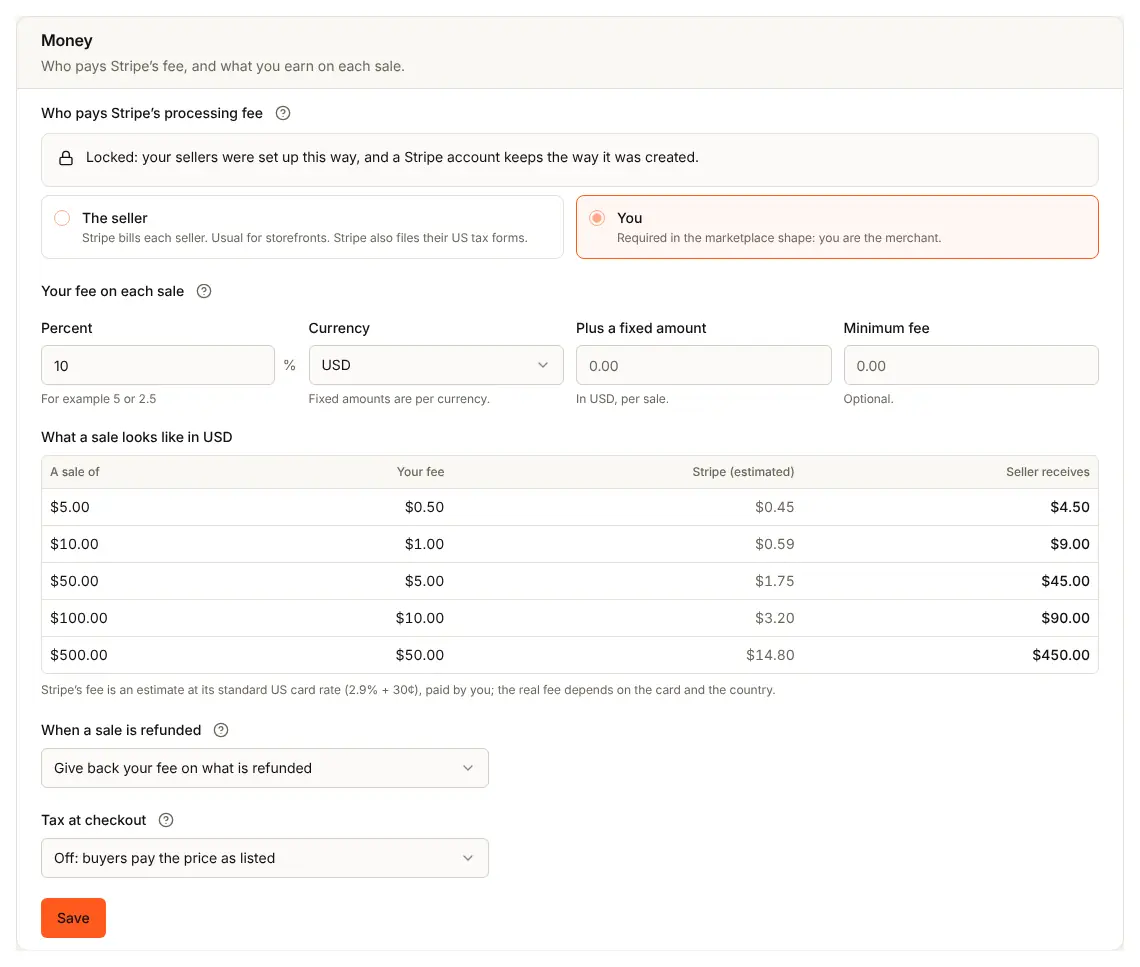
- Money. Set your fee (a percent, a fixed part and a minimum); the preview shows what a seller keeps at a few prices. Choose what happens to your fee on a refund, and whether Stripe Tax works out tax at checkout (tax at checkout). Leave tax off for a first sale.
- Who can sell. People, workspaces or both; their countries; your currencies; and whether you approve each seller by hand. A marketplace seller can be in fewer countries than a storefront seller: the list is the countries Stripe can pay out to from your account.
- Receive your sellers' Stripe events. Press Set it up for me, then Create the endpoint. It creates the Connect webhook endpoint in your Stripe account, so seller statuses and sales update by themselves. On a server without a public https address, create the endpoint in Stripe by hand (Developers, Webhooks, events from connected accounts, the Endpoint address shown in this step), press Check again under step 1, then paste its signing secret under Signing secret and press Save secret.
- Your terms and policies. Link your seller terms and refund policy
(both required), and your fee disclosure, buyer terms and privacy policy.
Each is a full
https://address. Set your Order page here too: without it, buyers get no receipt email. - Turn on selling. In Staging it runs on your test keys: nothing real is charged.
Every control that saves is a plan feature (selling through Stripe Connect). If your BuildBase plan leaves it out, the controls stay on screen, disabled, with the plan's sentence.
3. Design an item type
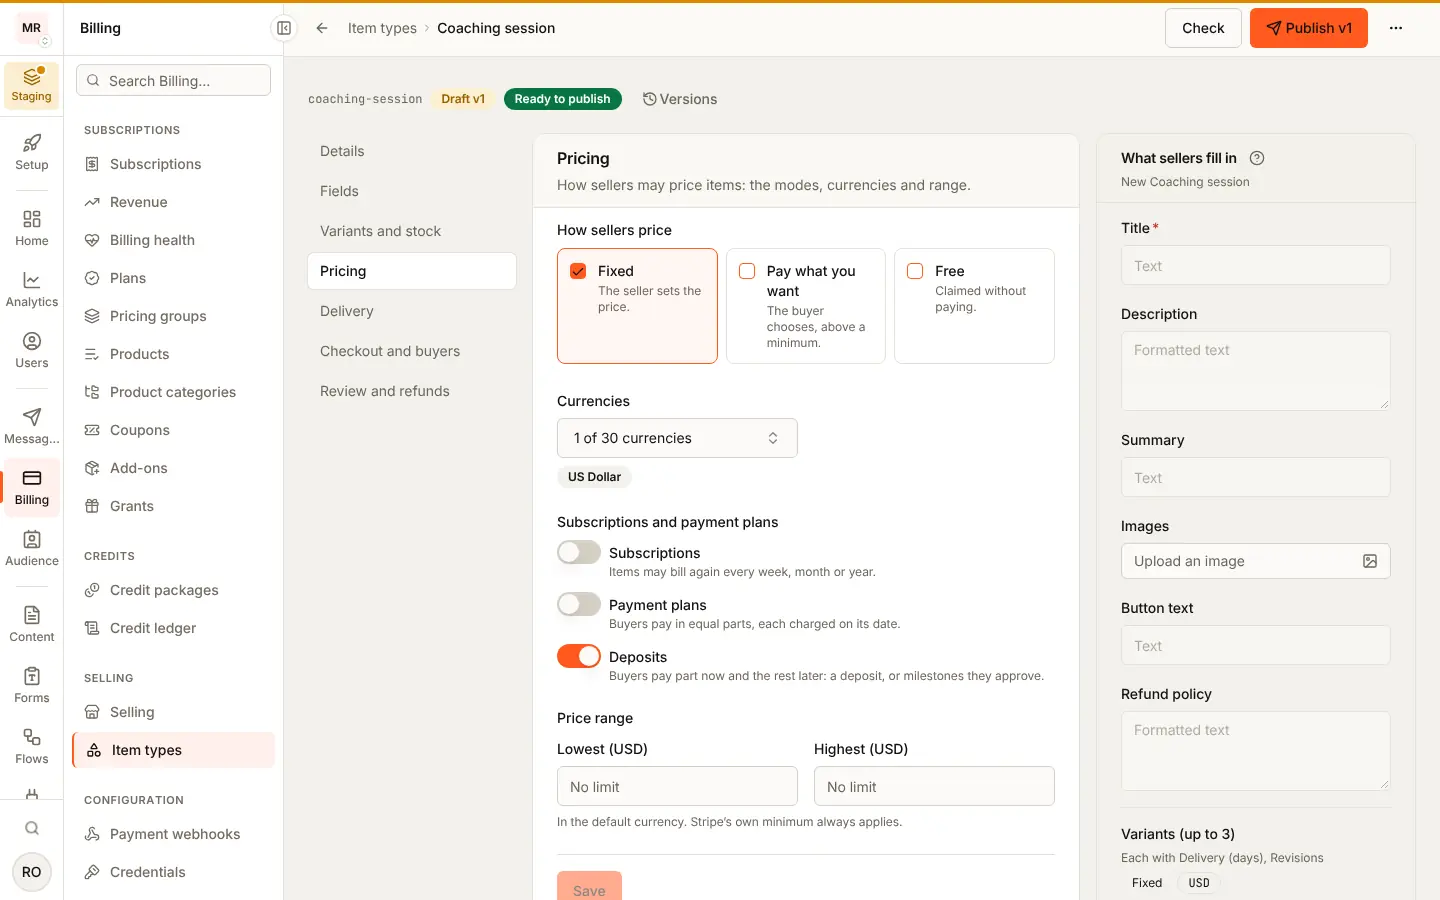
An item type is what your sellers can list: its fields, how it is priced, what the buyer gets. Open Billing, Item types, choose New item type and start from the ready-made Service or commission type. It sells a fixed price, and its buyer gets a message and work the seller delivers by hand, which is what makes fulfilment visible in step 9.
Name it Coaching session. The key, coaching-session, is made from the
name and cannot change. Work through the sections; each counts what stops
publishing. Under Review and refunds, turn on approving each new item
if you want to see the review queue in step 6. Then press Publish v1
and confirm.
More in item types.
4. Add the seller screens to your app
Install Stripe's Connect loader and pass it to the provider. BuildBase adds no Stripe dependency of its own.
npm install @stripe/connect-jsimport { ApiVersion } from '@buildbase/sdk';
import { SaaSOSProvider } from '@buildbase/sdk/react';
import { loadConnectAndInitialize } from '@stripe/connect-js/pure';
import '@buildbase/sdk/css';
export function BuildBaseProvider({ children }: { children: React.ReactNode }) {
return (
<SaaSOSProvider
serverUrl="https://api.console.buildbase.app"
version={ApiVersion.V1}
orgId="your-org-id"
loadConnectAndInitialize={loadConnectAndInitialize}
// auth and your other props as in the installation guide
>
{children}
</SaaSOSProvider>
);
}Allow https://connect-js.stripe.com and https://js.stripe.com in your
Content-Security-Policy's script-src and frame-src. Then give sellers a
page:
'use client';

import { SellerHome, SellerItems, useSaaSAuth } from '@buildbase/sdk/react';

export default function SellingPage() {
  const { user } = useSaaSAuth();
  return (
    <>
      <SellerHome
        subject={{ user: true }}
        defaultDisplayName={user?.name}
        defaultEmail={user?.email}
      />
      <SellerItems
        subject={{ user: true }}
        itemTypeKeys={['coaching-session']}
      />
    </>
  );
}
5. Onboard a seller
Sign in to your app as the seller and open the selling page.
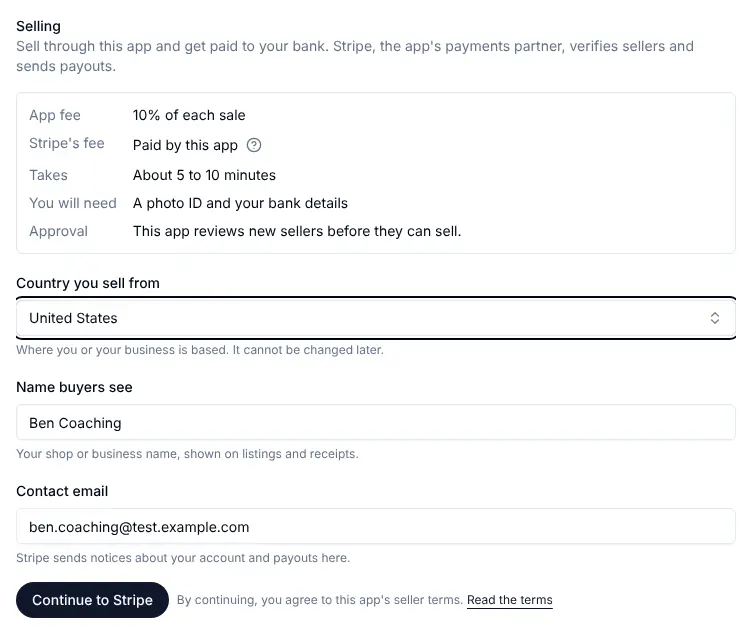
- Start selling shows your fee, who pays Stripe's fee and what to have
ready. The seller picks their country, the name buyers see and, in the
marketplace shape, an email: Stripe's contact for them
(
SELLER_EMAIL_REQUIREDwithout one). - Stripe's onboarding opens inside your app. In Staging, on your test keys, Stripe accepts its own test values for identity and bank details.
- Back in your app, the seller reads Can sell and Can get paid.
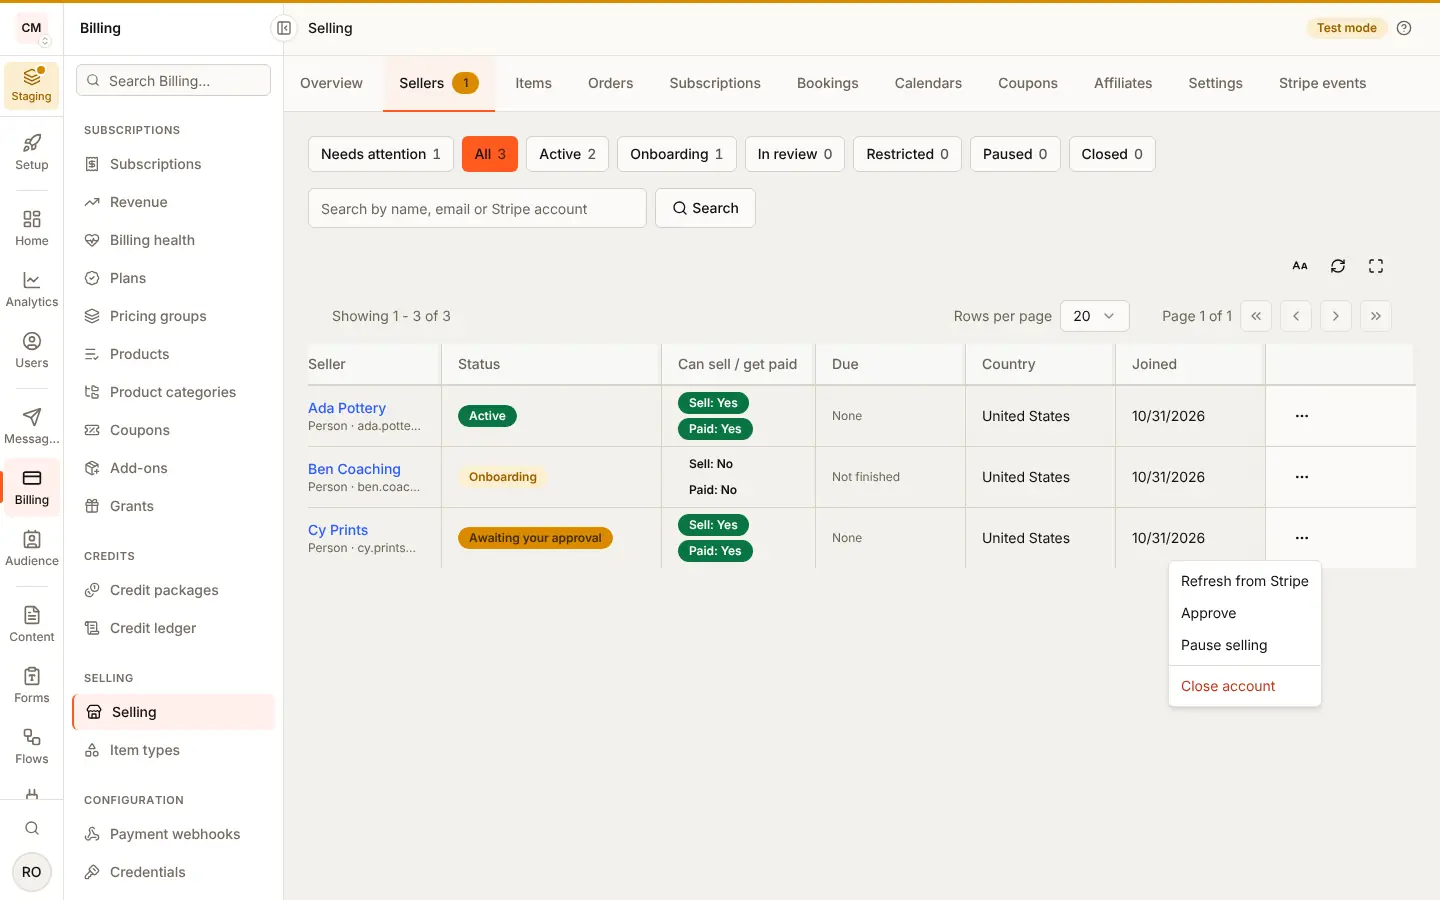
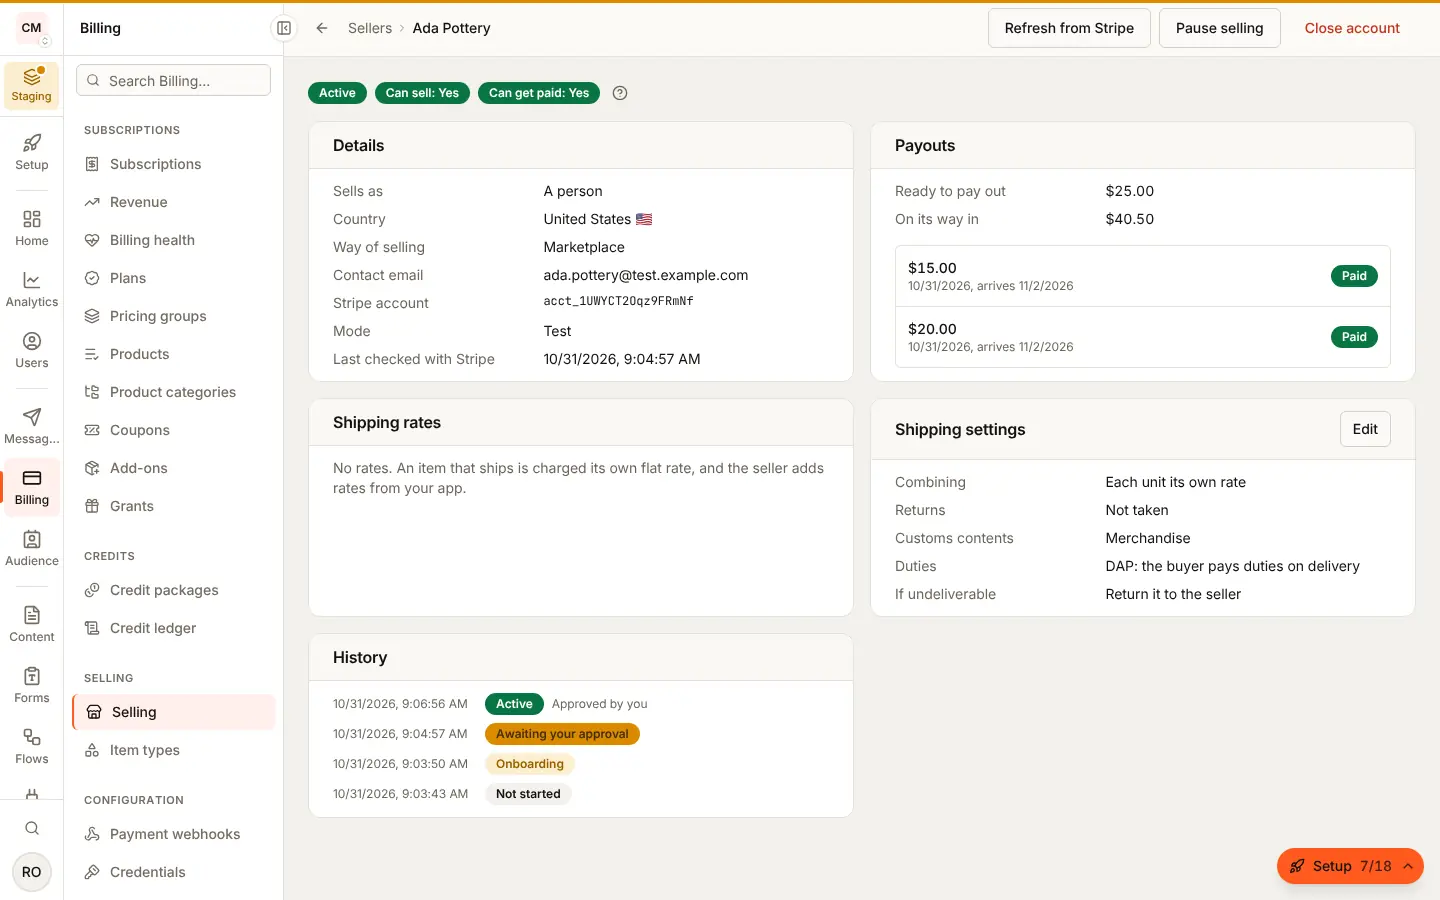
In the console, the seller is under Billing, Selling, Sellers, with their status and anything Stripe still needs. If you approve sellers by hand, the seller reads Awaiting approval until you open the row's menu (...) and choose Approve. The same menu has Refresh from Stripe, Pause selling (then Resume selling) and Close account.
More in selling.
6. Publish an item
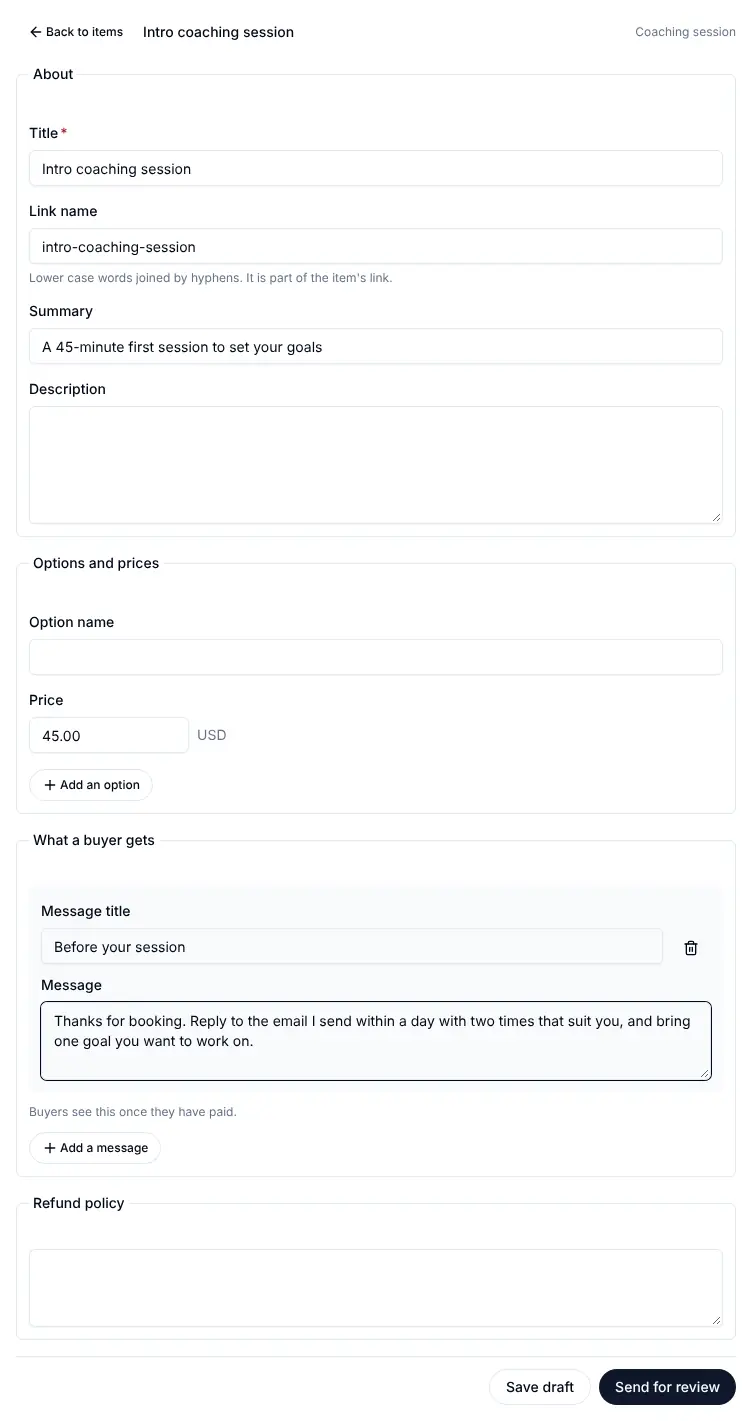
As the seller, in SellerItems, press New item and fill in an item of Coaching session: a title, a price of $45.00, under Add a message the message the buyer reads after paying, and, under Add something you deliver, what the seller will do (the buyer sees it). Press Publish; when the type has you approve items, the button reads Send for review.
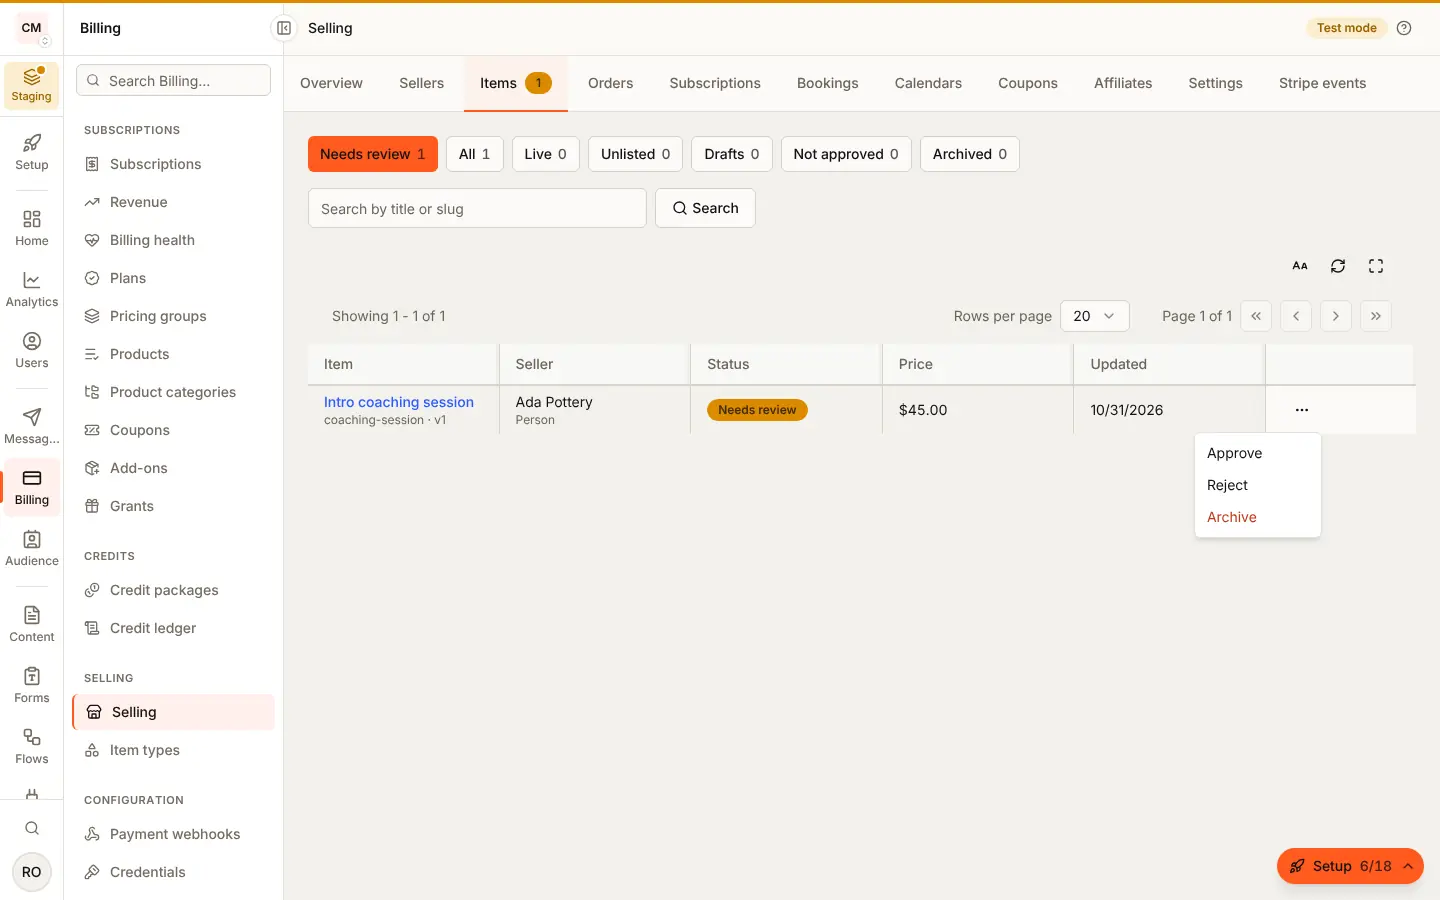
If the type asks you to approve items, the item waits in Billing,
Selling, Items, Needs review. Open its row's menu (...) and
choose Approve (or Reject); the seller gets the
Item Approved email and your server item.published with
action: 'approve'.
More in items.
7. A buyer pays
Put the item on a page of your app. The buyer must be signed in (or allowed to buy as a guest, under Selling, Settings, "Who can buy").
'use client';

import {
  BuyButton,
  formatMinorAmountIntl,
  usePublishedItems,
} from '@buildbase/sdk/react';

export default function ShopPage() {
  const { items } = usePublishedItems({ typeKey: 'coaching-session' });
  return items.map((item) => {
    const variant = item.variants[0];
    const price = variant.prices[0];
    return (
      <div key={item._id}>
        <h2>{item.title}</h2>
        {/* some prices have no fixed amount */}
        {price.amount !== undefined && (
          <p>{formatMinorAmountIntl(price.amount, price.currency)}</p>
        )}
        <BuyButton
          itemId={item._id}
          variantId={variant.id}
          priceId={price.id}
        />
      </div>
    );
  });
}
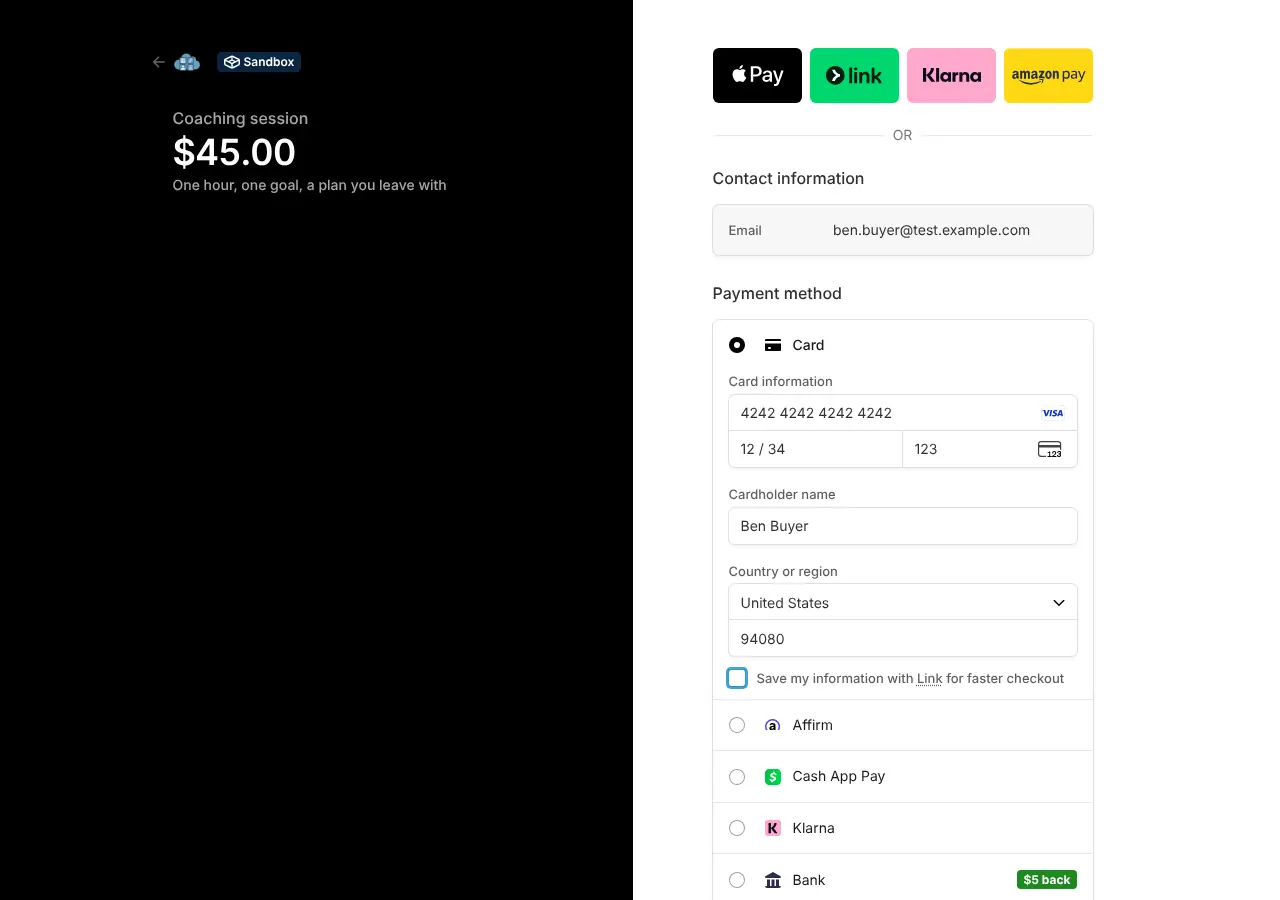
Sign in as the buyer and press the button. Stripe's page opens on your
Stripe account; in Staging, pay with Stripe's test card 4242 4242 4242 4242, any
future date and any CVC. Stripe sends the buyer back with
?checkout=success.
Show the order where the buyer lands; useMyOrder waits up to a minute for
Stripe's payment to reach your app:
import { useHoldings, useMyOrder, useMyOrders } from '@buildbase/sdk/react';

const { orders } = useMyOrders();
const { order } = useMyOrder(orders[0]?._id, { waitForPayment: true });
const { holdings } = useHoldings({ orderId: order?._id });
// order.paymentStatus: 'unpaid' until the payment lands, then 'paid'
What happens:
| Who | Gets |
|---|---|
| The buyer | The order and the seller's message; the Order Receipt email once you set your order page |
| Your server | order.created at checkout, then grant.created for each benefit and order.paid |
| The seller | The sale in <SellerSales>, with what they receive |
| You | The order under Billing, Selling, Orders, with your fee beside the total and how the money split |
More in checkout and orders.
8. Where the money went
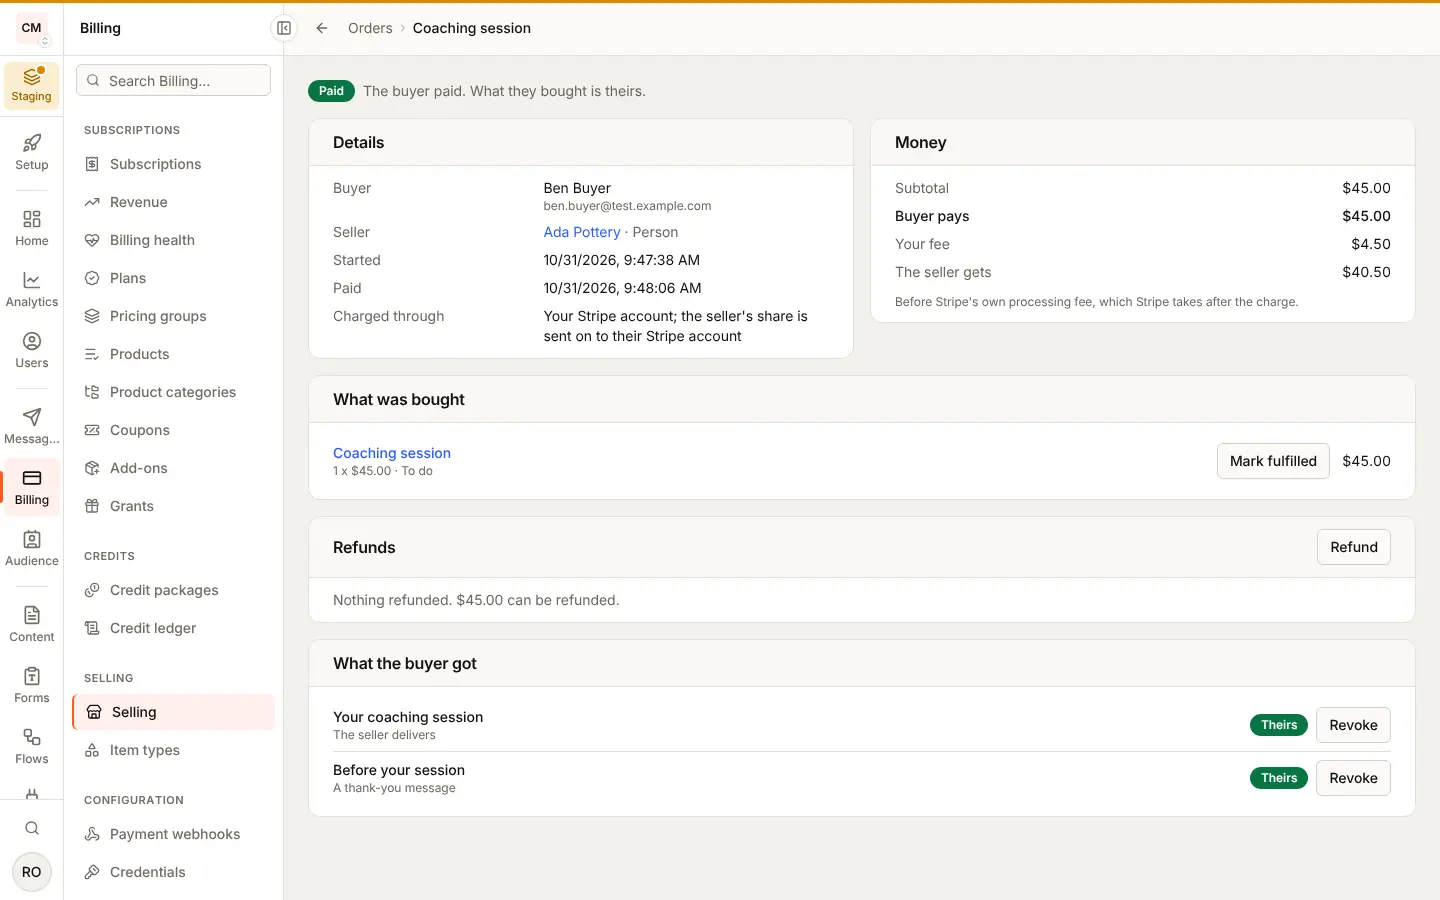
In the marketplace shape, Stripe charged the buyer on your account. Once
paid, the seller's share (the price less your fee) goes to the seller's
Stripe account as a transfer. Stripe's processing fee comes out of your
balance. The order page shows the total, your fee (appFee) and the
seller's share (sellerAmount).
9. Fulfil the order
An item that includes a benefit the seller delivers by hand (kind: 'manual', The seller delivers in the console) waits on the seller: its
line's fulfilment is due, and the order shows To do.
<SellerItems> adds that benefit under Add something you deliver when
the item type allows it, beside a message, a private link, a licence key
(Add a license key) and something your app delivers (webhook_only);
from your own screen or server it is
benefits: [{ id, kind: 'manual', title }] on the seller's item routes. An
item with only a message reads Nothing to send. The seller opens the sale in
<SellerSales> and presses Mark as sent with a note the buyer reads
(you can do the same with Mark fulfilled on the order page, or your
server with POST /api/v1/server/commerce/orders/:id/lines/:lineKey/fulfil).
Your server gets order.fulfilled with the line's key.
import { SellerSales } from '@buildbase/sdk/react';

<SellerSales subject={{ user: true }} />;
An item that ships follows its shipments instead (shipping).
10. Refund it
In the marketplace shape only you refund: the money came to your
account. A seller who tries is refused with REFUND_NOT_ALLOWED.
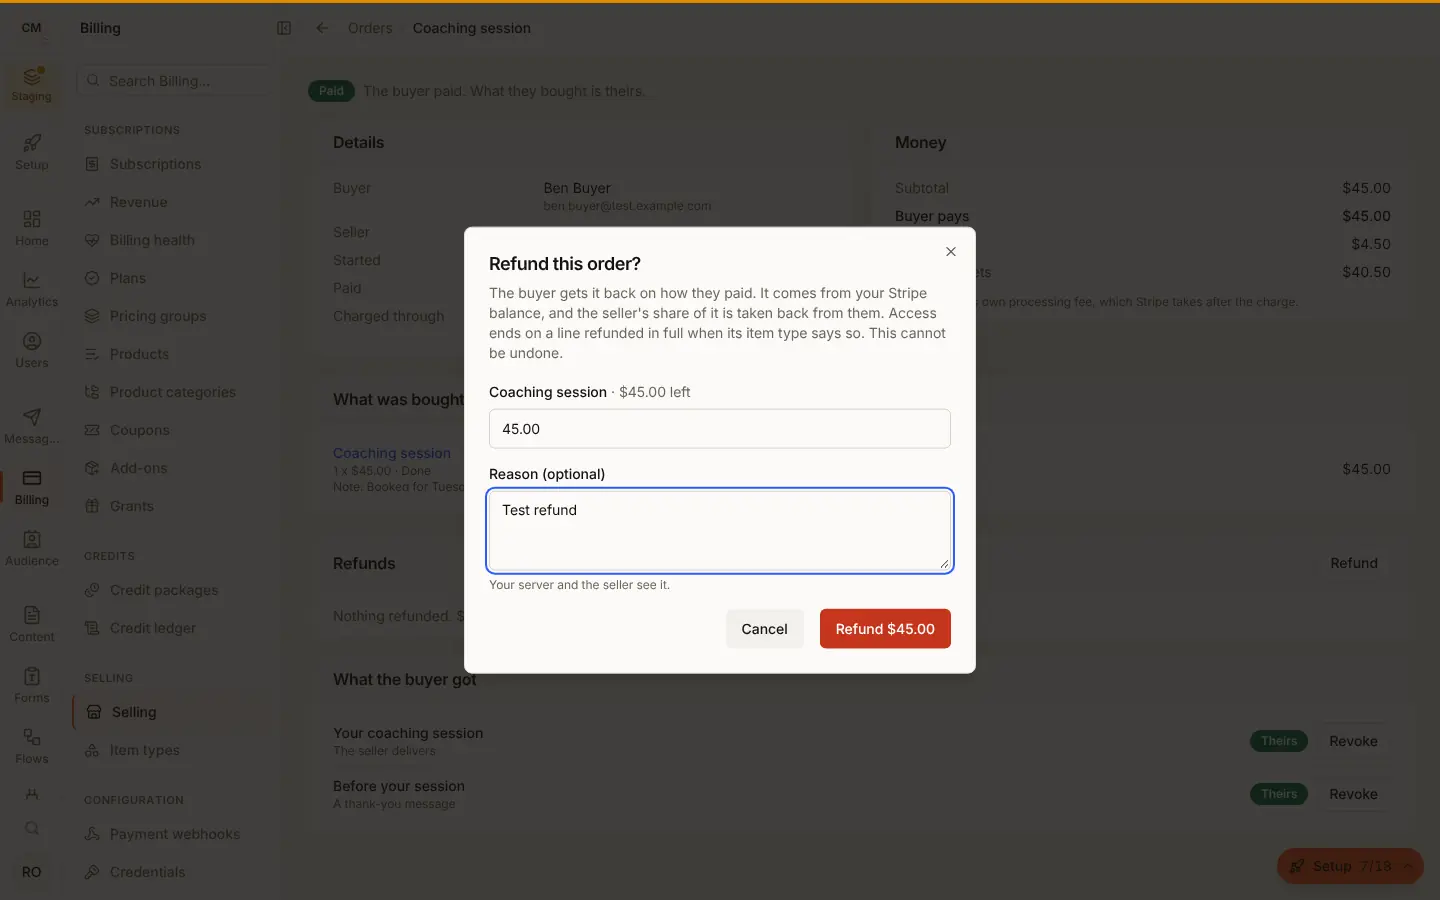
Open the order under Billing, Selling, Orders, press Refund,
choose the line and amount, and give a reason. The money goes back on the
buyer's card; the seller's share of it is taken back from their transfer,
and your fee on it goes back to the buyer unless you chose to keep it
under Money. Your server gets order.refunded, and with a full refund
of the line, grant.revoked when the item type says "After a refund: take
it back".
Your server can refund too:
POST /api/v1/server/commerce/orders/:id/refund with
{ amount, reason }. More in refunds.
11. Payouts
Stripe pays each seller's balance to their bank on their payout schedule.
The seller sees Payouts and balance inside <SellerHome>; you see each
seller's balance and latest payouts on their page under Sellers. Your
server gets payout.created, payout.paid and payout.failed.
Export your sales for your books with Orders, Export CSV: one row per paid order between two dates (exporting sales).
12. Tick off the go-live list
With selling on in Staging, the Overview tab shows Before going live: each item is something the platform checks. Setup steps, selling turned on, policy pages linked, tax on sales, Stripe events reaching the app, Reconcile running clean, a seller who can sell, a test sale paid and a test refund made. Steps 1 to 10 tick most of them. The last item, Going live, reads In Production: Staging uses Stripe test keys, and going live happens in your Production environment.
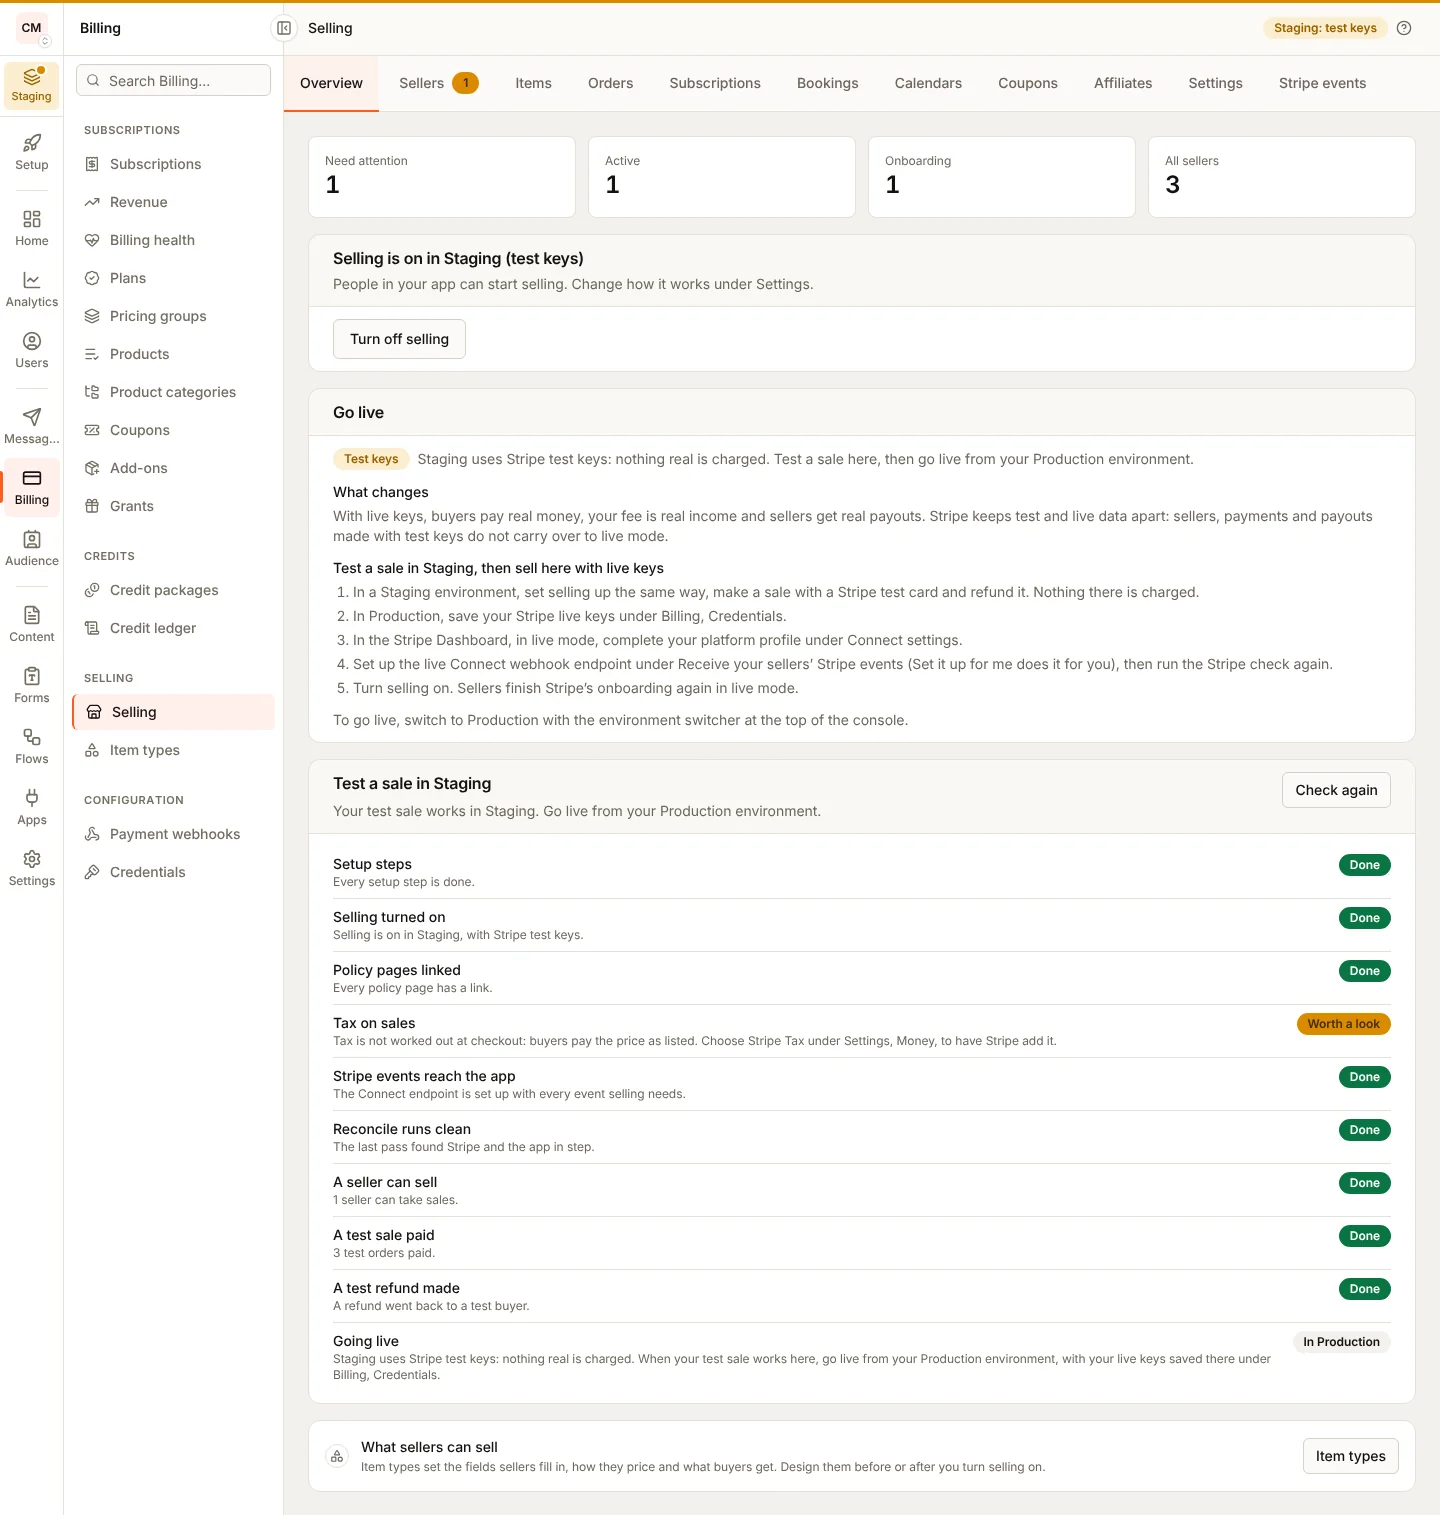
Your server reads the same list with GET /api/marketplace/go-live.
13. Go live in Production
- Switch to Production with the environment switcher at the top of the console. Production keeps its own settings and item types, so set selling up there as you did in Staging (steps 2 and 3).
- Save your Stripe live keys under Billing, Credentials. Until you do, Selling shows a Test keys badge; with live keys it reads Live.
- In the Stripe Dashboard, in live mode, complete your platform profile under Connect settings.
- Under Selling, set up the live Connect webhook endpoint (Set it up for me), and run the Stripe check again.
- Turn selling on. Sellers finish Stripe's onboarding again in live mode.
In Production, Before going live adds Platform profile in live mode, and a first sale there is recommended rather than required. Live keys reads Not yet open until live selling is open for your app; contact BuildBase support to open it.
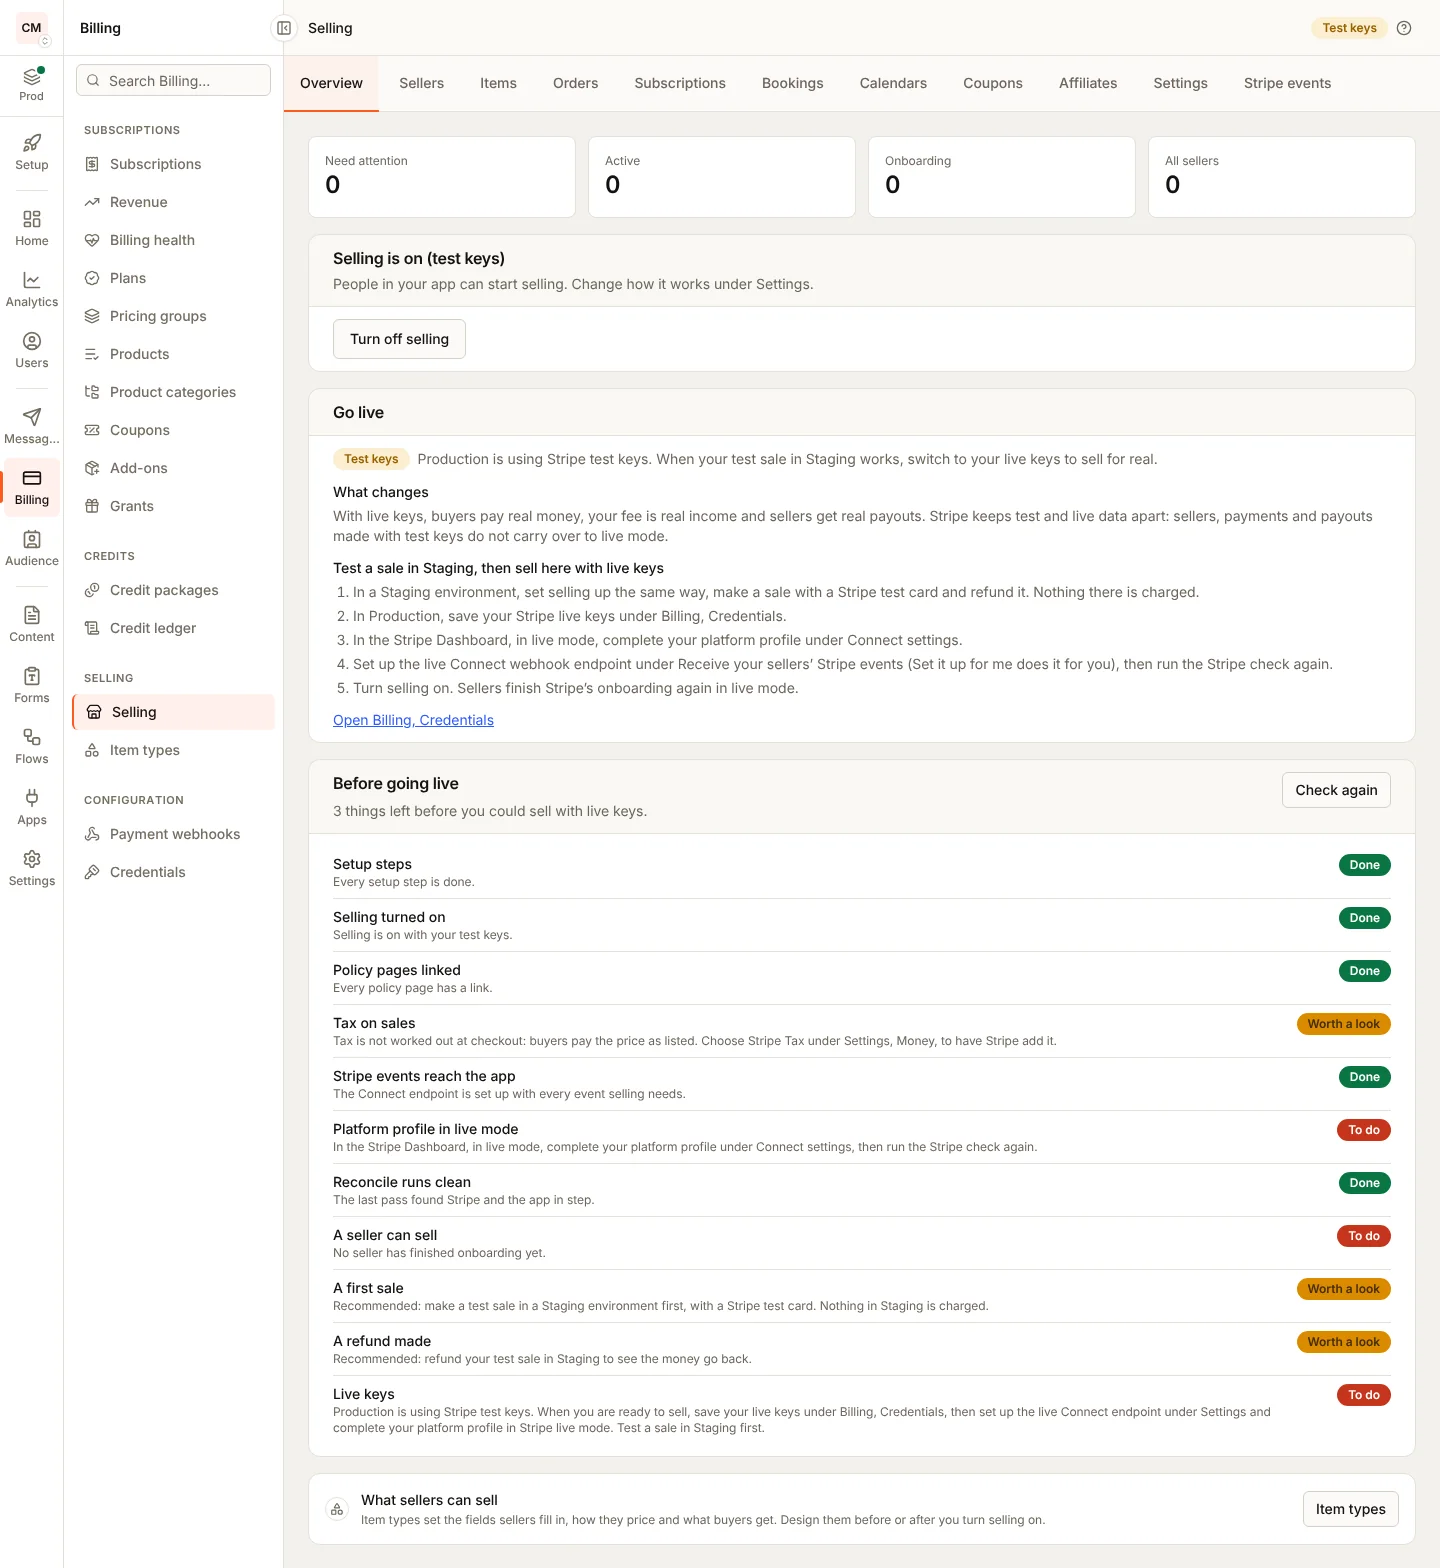
With live keys, buyers pay real money, your fee is real income and sellers get real payouts. Stripe keeps test and live data apart: each seller finishes Stripe's onboarding again in live mode, and test sellers, orders and payouts do not carry over. More in test in Staging, then go live.
When something stops you
| What you see | Why | What to do |
|---|---|---|
| Selling is not open for this app yet | Selling is off for your app on the platform | Contact BuildBase support |
| The Stripe check fails | Connect is off, or the platform profile is not complete | Follow the link on the failed check to the Stripe page that fixes it |
SELLER_COUNTRY_NOT_ALLOWED | A country you do not allow, or one Stripe cannot pay out to | Allow it under Who can sell, or use a storefront for sellers in that country |
SELLER_EMAIL_REQUIRED | A marketplace seller sent no email | Pass defaultEmail, or let the seller type one |
SELLER_CANNOT_SELL at checkout | The seller is paused, or Stripe needs more from them | The seller finishes what <SellerHome> asks; or resume them under Sellers |
The order stays unpaid after paying | Stripe's event has not reached BuildBase | Check Stripe events; press Reconcile now under Settings |
REFUND_NOT_ALLOWED | A seller refunding in the marketplace shape | Refund from the console or your server |
REFUND_FAILED | Stripe made no refund | Read the reason in Stripe; nothing was returned or counted, so try again |
| Live keys refused under Billing, Credentials in Staging | Staging takes Stripe test keys only (sk_test_, pk_test_) | Save your live keys in Production |
SELLING_UNAVAILABLE: This environment sells with Stripe test keys only | A live key in a non-production environment such as Staging | Use test keys there; go live in Production |
SELLING_UNAVAILABLE with live keys | Live selling is not open for your app yet | Contact BuildBase support, or save your test keys again |
LIVE_SELLING_NOT_ALLOWED (403) with live keys | Your app is not on the live-selling pilot list yet | Contact BuildBase support to join the pilot; keep testing with test keys |
Next steps
- Checkout and orders - carts across sellers, subscriptions, paying in parts, files and licence keys.
- Coupons, bundles, options, bookings, affiliates and shipping.
- Zero to first sale: storefront - the other shape, side by side.